Even as far back as 2020, during the height of the pandemic, research was being conducted on the effectiveness of video conferencing in education, and some such research concluded that online meetings would remain popular long-after the pandemic was over. My personal experiences have certainly mirrored these predictions – tutoring has moved mostly online, online meetings are still being used by many schools for parent-teacher conferences and schools still find that an online meeting is the most convenient way to bring everyone together efficiently, even if everyone is in the same building! Some schools are still using online meetings for assemblies too – an efficient approach as all of the students can remain in their classrooms and simply ‘enjoy the show’ on the classroom smart board or projector.
The corporate world has likewise seen a dramatic shift towards online conferencing, and as a part of a recent Powerful Public Speaker Workshop I delivered to a team of insurance professionals here in Bangkok, I was asked to speak about the rules/etiquette people should follow for online meetings. The following seven rules are the result of my deliberations, and if you wish to download and use the slides I delivered to this corporate client, then you can find it linked as a pdf file at the end of this blog post. Please note that I have put a ‘teaching spin’ on each of the following rules to make them as relevant as possible to educators (which you will not find in the pdf file).
An overview
I was thinking about putting this summary at the end, but I think it’s relevant here. When it comes to ALL online meetings, remember the acronym MEET UP R:
Rule #1: Know your platform
Are using Google Meets? Maybe it’s the dreaded Cisco Webex (dreaded because I have such little experience with this platform). Perhaps it’s Zoom? Maybe you’re using Microsoft Teams for the first time?
Whatever platform it is that you’ll be required to use, the first Golden Rule is that you become familiar with the software. Spend at least 15 minutes before the meeting starts just getting used to the controls and settings, if you’re a newbie. Also, if you haven’t used a platform in over a month, then carry out the due diligence of checking its functionality first – it may well have changed since you last used it!
Rule #2: Be there early!
The reasons for the inclusion of this rule are not so obvious upon first inspection. Here’s why you need to try logging-in early:
Unexpected system updates can slow down your start (this has happened to me multiple times over the last several years)
WIFI may take time to set up. Don’t assume that that you’ll always be able to get online in the same way every time, using the same WIFI (especially if it’s public WIFI, such as that you would find in a coffee shop). Again – updates to systems and protocols do happen!
Bluetooth (e.g. For mics and headphones) may take time to set up (and setup protocols can change after system updates)
You may need an alternative device if there’s a technical problem (e.g. a smartphone connected to a 4 or 5G network)
Familiarity can often be the enemy of online meeting etiquette. On many occasions I have, for example, turned up at the same coffee shop multiple times in a row to use the same WIFI, only to find that the login procedure has changed. This unexpected hurdle clearly slows down my login time.
Getting to your online meeting destination early, and attempting to log-in early, allows you time to fix any issues that may come up.
Rule 3: Switch on your camera
The visual element of meetings is important. When you show yourself to the online audience via the camera, there’s no doubt in anyone’s mind that you are present and attentive. Those who leave their cameras switched off do, unfortunately, arouse suspicion. If you absolutely must leave you camera switched off (e.g. so as to reduce your network traffic and allow for an audible meeting), then at least tell the host in advance (if you can).
If you are the meeting host, then don’t be afraid to ask people to switch on their cameras too – facial expressions, nods, mannerisms and other visual information forms part of the effective communication ‘dance’ that must play out in an online meeting.
Rule 4: Mute your microphone when you are not speaking
Background noise can interfere with the meeting (especially via sensitive tech, like expensive earphones). Also, experiment with different mics (e.g. wired or wireless – which microphones provide clearer sound to your audience?).
Last year I purchased a very expensive set of AirPods Pro for use in online tutoring meetings. They’re beautiful – but not every student I teach likes them. They are so sensitive to background noise, that in some locations in which I am sitting the students find that they cannot hear me clearly, and I have to use wired earphones/mics (even when I turn on noise reduction).
It’s good practice to have at least three modes of voice input to your online meeting available, if possible:
The computer’s built-in microphone and speaker system (probably not the best if you’re in a public setting)
Wired earphones with integrated microphone (if you have an earphone jack on your PC)
Bluetooth headset/earphones
Having three systems, such as these, will enable you to join the meeting and communicate even if one system fails (and this, again, has happened to me multiple times!).
Rule 5: Raise your hand if you want to say something
This can be done visually (on camera), or through a hand-raise tool. Raising your hand on camera is usually better for smaller meets.
Check out my award-winning book for high-school teachers, available on Amazon.
Rule 6: Watch the chat window!
Requests and questions may come up at any time, so make sure you keep your eyes on the video conferencing software’s integrated chat feature window (and make sure you know where it is located too). At the very least, whether you are the meeting host or not, check the chat window before going for a break or leaving/closing the meeting – there could be some vital information in there!
The chat window can also be a good place to receive/ask questions and to leave contact information (e.g. if you are meeting with outside stakeholders, such as parents, teacher-training providers or ECA services).
Rule 7: Leave at the appropriate time, and in the appropriate way
If you need to leave early, then let the host know in-advance.
You can slip out unnoticed, but please leave a message in the chat window to say goodbye to the participants.
Respect people’s time, just as you would in a physical meeting (e.g. try not to make the meeting too long)
Teaching is one of the most stressful professions on Earth. From behaviour management issues, to meeting deadlines and working on projects in small teams: teaching, as a job, requires very high levels of competency, lots of patience and bucket loads of resilience. Take these recent, shocking revelations, for example:
The Headspace 2023 Workforce Attitudes Toward Mental Health report found that British people overwhelmingly deem education to be the most stressful career path available, with an alarming 93% of those in the profession feeling stressed at least once a week!
In such a complex and dynamic environment as a school, in which in our ‘product’ is the gradual and positive development of children (i.e. the most complex beings in existence), it is only natural that we will make mistakes along the way and be involved in a wide variety of professional ‘incidents’ that may cause us some frustration.
It is at these times that we MUST remember the ‘Four S’s’:
Stop
Smile
Sleep
Send
Here’s a handy graphic to remember the process (feel free to share this with colleagues):
Let’s go through these steps one-by-one:
#1: Stop
I once witnessed a former colleague shout at a fellow language teacher in the staff room, calling him ‘unprofessional’ and saying that his actions were ‘unacceptable’. Of course, the issue causing the altercation was a trivial matter, but by her getting emotional and berating him in front of everyone she achieved nothing, and actually did a lot of harm to her reputation. Everyone was talking about that exchange afterwards, and guess who came out as the ‘good guy’ in people’s minds? – The polite language teacher who just stood there and listened and didn’t respond or get emotional, of course.
It’s so tempting to respond by reflex-action in a moment of frustration, venting our anger in an email, a verbal exchange or other action. It’s so crucial to be mindful of our emotions when we feel frustration bubbling up inside of us and remember to STOP!
#2: Smile
Numerous studies have shown that a simple smile can immediately improve our mood. Take a moment to reflect upon what you are grateful for in life. If nothing comes up, then ask yourself “What COULD I be grateful for right now?”. This act of ‘reframing’ the moment will act to alleviate any feelings of dread, anxiety or frustration – even if it’s only by a small amount.
#3: ‘Sleep on it’
If you find yourself becoming angry, anxious, enraged or frustrated by any situation at school, then pause for a while and calm down before you respond. If possible, respond to the issue the next day after a good night’s sleep – you’ll be in a better mood and will be more emotionally balanced to handle the issue rationally.
In my experience, almost every incident that causes a teacher frustration can be dealt with the next day, when we are in a better mood. If this is not the case for whatever you happen to be dealing with right now, then at least Stop and Smile, and wait a while before responding.
#4: Send
Have you been guilty of sending a quick response email out of frustration? I know I have. For one former coworker of mine, this had catastrophic consequences.
The head of our secondary school had emailed a colleague of mine in a former school I worked at to discuss some behaviour management issues that some children in his classes were having. This colleague then replied out of anger and frustration, justifying himself in every which way possible, but he inadvertently cc’d the entire secondary school in his response!
He didn’t last long at that school. His reputation in the eyes of his colleagues had soured, and his position became somewhat untenable. He was let go at the end of that academic year.
Please – be the person who responds when your emotions are stable. We ALL get frustrated at times. We ALL get angry a times. We ALL panic at times. Please – Stop, Smile. Sleep THEN Send/Respond.
Extra advice for dealing with frustration at school
Speak to someone
Speak up about any issues you are having, in a positive and non-complaining way. The trick to executing this is to be ‘solution focussed’. When talking with your line manager about the issue, or whomever the other parties are, adopt the mindset of ‘This is the problem, so how can we work together to find the solution?’.
Only click ‘send’ when you are in an emotionally positive state
E-mails last forever, and once they are sent, they can be fully utilised in any litigation that may follow. Silence is always the best option at first, if possible, then only send a written response/summary of the issue after very careful consideration. In some extreme situations you may wish to speak with a lawyer before responding.
Learn new skills
If behavior management is causing frustration, then seek to learn new strategies or ask colleagues for help. Resources like this blog can be very useful for acquiring new tips, as can professional development courses. If your issue is skills-related, then you may find that a professional development course, such as my Powerful Public Speaker Certificate Course, may be of use to you.
Find a good lawyer, and build a good relationship with them, regardless of your situation
It has been my experience via the many hundreds of online coaching calls I have done with teachers over the years that extremely few educators understand their legal rights. Employers can sometimes pray on this naivety – few teachers will approach a lawyer when their employment is terminated, or when contractual changes arise, or when they are asked to sign a sudden ‘official school document’, for example. Get used to consulting with lawyers. Yes, they’re expensive, but the investment is worth it in the long run. If you are lucky enough to teach in a country where teacher unions exist, then make sure you are an active member – they will be able to offer legal advice when the need arises, too.
We welcome you to join the Richard James Rogers online community. Check out our official Facebook Page, Instagram and Podcast for regular updates.
Unless you’ve been hiding in acave for the past five years, it’s highly likely that you have heard the phrase ‘retrieval practice’ being bandied about multiple times at educational seminars, Professional Development workshops and even in the departmental meetings you’ve attended at school. It’s one of those areas of pedagogy that has gotten educators excited due it’s evidence-based effectiveness, as well it’s inclusion, affirmation and promotion of metacognitive strategies (another hot topic in education).
It is my observation, however, that the majority of teachers are not 100% clear about what retrieval practice actually is – in part because some of the professional literature on the issue is conflicting, and also because as a concept it complexifies something rather simple (something that teachers have being doing for decades):getting students to reflect upon and use what they know.
In today’s blog post, I aim to provide my readers with the following:
A simple, understandable description of what retrieval practice is
A handy acronym (P.O.W.E.R.) that we can all use to remember the stages we need to follow as teachers when carrying out retrieval practice with our students
Some ideas on techniques and activities we can use in the classroom to facilitate good retrieval practice
Think ‘expression’ as opposed to ‘ingestion‘
I was most impressed with this great video by Unleash Learning which described retrieval practice as focusing on getting information out of students’ heads, rather than into students’ heads. This implies that retrieval practice only works if information has been put into the students’ heads in the first place – and this is true – retrieval practice is used as a follow-up when students have already been taught the information they need to know.
Retrieval practice is used as a follow-up at some point after a topic/unit has been taught.
Students should be encouraged to articulate what they have learned in some way, and then use what they have learned in some way (e.g., to answer an exam-style question). Retrieval practice places heavy emphasis on learning rather than assessing, although low-stakes assessments can be used as part of the retrieval process (see this blog post of mine on assessment ‘for’, ‘of’ and ‘as’ learning for more info on that!).
Give your students the P.O.W.E.R. they need to succeed!
So, let’s look at an easy-to-remember step-by-step process for facilitating retrieval practice in the classroom – the P.O.W.E.R. technique.
Prime (P): Prime the Mind
Start by priming the mind. Review essential concepts, key points, or summaries to prepare your students for the learning experience ahead.A great activity for this is Mind Map Mayhem: Encourage students to create colourful mind maps summarizing key concepts from the previous lesson. They can use doodles, arrows, and even emojis to make it visually appealing. This primes their minds for what’s to come!
At this stage, summaries do not need to be organized – they can be scattered and random, and do not necessarily need to be handwritten – a group discussion, quick verbal presentation to the class or even a bulleted list will suffice.
Organize (O): Organize Thoughts Actively
Encourage active organization of thoughts. Have your students organize information in their own words, creating meaningful connections and enhancing comprehension through an engaged approach. There are many tools that can be used for this, but my favorites are:
Mnemonics
Acronyms
Infographics
Graphic organizers
Google Slides, Docs, Sheets and Sites
Flow charts
Audio notes
It’s quite important at this stage that information follows the required pattern in which it needs to be retrieved in the final exams – e.g. the stages of cell division (in order), a timeline of King Henry VIII’s reign (in order), the points to raise in a written response to a language question (in order), etc.
Wrestle (W): Wrestle with Challenges
Yes! – we finally have a teaching acronym with ‘Wrestle’ in it (cue the giggles in teacher workshops all across the world from this point onwards). If nothing else, this wise choice of a word will help us all to remember that in this stage the students should tackle thought-provoking questions that demand active recall.
This step engages the mind in a mental wrestling match, strengthening memory and reinforcing the learning process.
The questions do not necessarily need to be provided in a mini-test or handout format (although you can go with that too), live quiz apps, verbal questioning, exam-style questions, past-papers, flash cards, quick writing exercises, worksheets and learning journals can all be used as tools to facilitate this process. At this stage, the questions should be low stakes, so that making mistakes is encouraged.
Evaluate (E): Evaluate Understanding
Promote self-evaluation to gauge understanding. Guide your students to reflect on their comprehension, identifying areas of strength and pinpointing topics that may require additional attention.
Check out my award-winning book for high-school teachers on Amazon. Purchases support the creation of my blog posts and podcast episodes.
A great technique that teachers have been using for decades for this is Traffic Lights. Provide students with red, yellow, and green cards. Ask them to hold up the corresponding card to indicate their understanding. Red for unclear, yellow for partial, and green for solid comprehension. It’s a quick and visual way to evaluate understanding.
Again, live quiz apps can be used for student self-evaluation, as well as self-reflection rubrics. Metacognitive tools, such as self-regulation checklists, are also great for this.
In my current practice, I like creating Google Sheets in which students can type in their reflections as they do them – essentially creating a long-term digital journal/record of their progress. The sheets are very simple – usually asking which questions the students got wrong, why they got them wrong, and what they should do next to improve further. When created on a Google Classroom assignment, one sheet is enough, as a copy will be made for each student if you select the correct option from the drop-down menu.
Reinforce (R): Reinforce Through Practice
Transition to reinforcement through practice. Engage your students in hands-on activities, be it additional past-paper questions, problem-solving scenarios, experiments, or real-world applications. This step solidifies knowledge and encourages practical application.
Practice makes perfect!
One activity you might want to try (if you’re looking for something unusual) is Escape Room Extravaganza. Create a virtual or physical escape room with challenges related to the lesson. Students work in teams to solve problems, unlock clues, and apply their knowledge. A QR-code treasure hunt may work well for this, for example. It’s a fantastic way to reinforce learning through collaboration and critical thinking.
Conclusion
Retrieval practice is essentially a way to build long-term memory of concepts, skills, ideas, key vocabulary, techniques and knowledge. At some point after a topic or unit has been taught to your class, use the P.O.W.E.R. strategy to get your students retrieving that prior knowledge – you’ll soon find that concepts will be generally better understood, performance in future assessments will increase and students will feel more confident articulating, processing and recalling the material they have covered.
Recommended further reading
Head over to retrievalpractice.org where you will find lots of free, downloadable pdfs containing tons of advice on how to implement retrieval practice in your lessons.
We welcome you to join the Richard James Rogers online community. Check out our official Facebook Page, Instagram and Podcast for regular updates.
Slides are a staple of effective teaching, corporate presentations and workshops. They’re so ubiquitous, in fact, that many of us don’t realize just how much of a legendary, legacy technology they are. I was surprised to learn during my research for this blog post, for example, that MS PowerPoint was released way back in 1987! PowerPoint and other slide-based information delivery systems have stood the test of time because they are, essentially, extremely effective content presentation tools.
Slides are here to stay – that’s undeniable, so let’s discover the common mistakes teachers are making when utilizing them (note to reader – I have made ALL of the mistakes I’m about to mention at some point or another in my career, so I’m a real expert on this topic!).
#1: Putting too much text on each slide
The content needs to be readable, and not overwhelming. When we fill our slides with text, we tend to not only make our sentences too small for learners at the back of the class to read, but we also present too much information at once.
Whilst we often have a lot of stuff to get through in a lesson (especially if you are teaching exam-level students), consider spreading the information out over more slides. 3 sentences per slide on 3 slides, for example, is better than 9 sentences all crammed together on one slide.
#2: Making students copy from slides
Here are the problems this causes:
Children have different writing speeds, and you’ll always find that the majority of the class are sat around waiting for the slow students to finish copying.
It dramatically slows down the pace of your lessons, making it difficult to keep to a curriculum map schedule (if done repeatedly).
Copying notes from slides is one of the most ineffective ways to learn new content. According to Make It Stick (a book I highly recommend) when no effort is required in the learning process, learning doesn’t last very long. The book’s authors cited one study where students were allowed to copy notes word-for-word on some material but were made to rephrase other material in their own words. When tested afterwards, students did a much better job of recalling the material they had to put into their own words.
So, how do we solve this problem, especially when we have so much content to get through?:
Consider providing printouts of slides with blank spaces for the children to fill in along the way. I remember one of my Biochemistry lecturers doing this at Bangor University when I was an undergrad there and I loved it – not least because I was getting accurate notes to take home, but also because I had to focus on the lesson in order to fill in the blanks correctly. Whilst this is perhaps not the most effective way to learn content out of all the methods available, it does solve the problem of pace (i.e., you won’t go too slow using this method).
Consider differentiating texts by using the methods outlined in this blog post, in order to make large paragraphs more digestible for your learners.
#3: Not making slides interactive
Include some exam-style questions along the way during your slide presentation to break up the lesson a bit. Consider word-matching activities, fill-in-the-blanks, or even just questions with allotted time for the students to answer. Perhaps you could embed a link to a live-quiz app (such as Blooket, Quizlet Live or Kahoot!) into your slides to get your students competing in a healthy way.
#4: Not sharing the slides with the students
It’s so important to make the slides available to your students once the lesson is over, and for some classes it may even be appropriate to share them before the lesson begins.
VLE and LMS platforms, such as Google Classroom, Moodle, Firefly and others are perfect for this.
With pre-university students, such as IBDP or ‘A’ – Level learners, I often find that it’s helpful to share the slides ahead of time, as the students can then read ahead before the lesson begins.
Whichever method you choose, just make sure the materials are available to your students. That way you cannot be criticized for not providing the resources that your students need to revise for their tests and assessments.
#5: Reading the slides to the class
This is an absolute no-no for teachers and is an obvious behavior to avoid to those who are more experienced in the profession. For new and trainee teachers, however, it can be a challenge to present slides without reading from them.
Teachers tend to read from slides for two main reasons:
Lack of subject knowledge/lack of reading ahead
Nervousness
Consider the following solutions:
Freeze your slide and move to the next slide on your computer. Quickly glance at, and read, the slide on your computer screen before presenting it to your class. This will help you to re-phrase the content into your own words.
Print out a copy of the slides for yourself and have it in your hand during the presentation. Again, this will allow you to read-ahead in ‘real-time’.
This sounds obvious but READ AHEAD. Never present a slideshow without reading over it first (avoid sourcing a slideshow from a third party on the internet immediately before a lesson begins).
Practice pronouncing key vocabulary and technical language before the lesson begins.
My Award-Winning book for high-school teachers.
Other mistakes teachers are making with slide presentations
Getting the visuals wrong – include nice pictures, charts and graphics where possible, and make them big enough for the class to read. If you’re stuck for time, then SlidesGPT can use AI to make a visually appealing slide presentation for you with just a few prompts (FYI – always CHECK the slides once generated). In addition to this, MS PowerPoint now comes with visual suggestions and can make slides visually appealing by using its AI Copilot feature.
Not annotating slides – if you have the technology (e.g., a smartboard), then annotate your slides as you present them. Circle key words, underline key phrases, add extra information and even re-phrase things. This will serve to make the content clearer for your students.
Conflicting colors – Are your slides readable? Always check the color balance before you present (red text on a black background, for example, is notoriously difficult to read!)
Unclear fonts – avoid Brushscript! Calibri, Comic Sans and Arial tend to work really well for presentations.
Shameless plug – check out my Powerful Public Speaker Certificate Course
If you are interested in some excellent Professional Development for you or your team, which focuses on making your slide presentations as perfect as possible, then check out my Powerful Public Speaker Certificate Course. This can be delivered online or on-site. Feel free to e-mail me at info@richardjamesrogers.com if you’d like to book me for this training.
We welcome you to join the Richard Rogers online community. Like our Facebook page and follow us on Twitter for daily updates.
A quick Google search of the top ten hot topics in education right now yield’s mixed results. From government funding to project-based learning and ‘Genius Hour’: the lists are as varied and as interesting as the great people who author them.
None of the pedagogical practices we all love to implement in the classroom can happen, however, if the schools we work in aren’t safe places. Safety has to be every school’s number one priority, and everyday teachers have a pivotal role to play in creating secure learning environments for children:
Teachers are crucial for creating psychologically and physically safe school and classroom environments, and their relationship with the learners entrusted to them is key in preventing and responding to all kinds of school violence.
Despite this pivotal role that teachers play in safeguarding children, however, a multifaceted approach is required to create safe schools: one that covers considerations at the local, national, and international levels. This blog post aims to delve into these key paradigms.
Local Level: Building a Foundation of Safety
At the local level, school safety starts with a strong foundation of communication, prevention, and collaboration:
Security Measures: Implement physical security measures such as controlled access points, surveillance cameras, and well-defined emergency evacuation plans. Conduct regular drills to ensure that students and staff are familiar with these protocols.
Bullying Prevention: Foster a culture of inclusivity and respect by implementing comprehensive anti-bullying programs. Encourage open dialogue and establish a reporting system to address incidents promptly.
Mental Health Support: Provide students with access to trained counselors and mental health professionals. Create a stigma-free environment that encourages students to seek help when needed.
Community Engagement: Involve parents, local law enforcement, and community organizations in the school safety conversation. Collaboration enhances the overall safety network.
Technology: Leverage technology for instant communication during emergencies. Implement notification systems that can reach parents, staff, and students rapidly.
National Level: Policy and Standards
Ensuring school safety at the national level involves the formulation and enforcement of comprehensive policies and standards:
Legislation: Develop and enact laws that mandate safety measures in schools. This could include regulations on school infrastructure, background checks for staff, and protocols for responding to emergencies.
Training and Professional Development: Require regular training for teachers, administrators, and staff on topics like emergency response, conflict resolution, and identifying signs of mental distress.
Data Collection: Establish a national database to track incidents related to school safety, including bullying, violence, and mental health issues. This data can inform policy decisions and preventive measures.
Funding: Allocate funds to support the implementation of safety measures in schools, especially in underserved areas. This can include hiring additional security personnel, upgrading facilities, and providing mental health resources.
Collaboration with International Bodies: Exchange best practices with other countries and international organizations. Collaborative efforts can lead to the development of innovative safety strategies.
International Level: Global Exchange of Ideas
Safety in schools is a universal concern, and international collaboration can provide a broader perspective and valuable insights:
Sharing Best Practices: Participate in international conferences and forums focused on school safety. Learn from successful initiatives in other countries and adapt them to local contexts.
Global Standards: Work with international organizations to establish global standards for school safety. This can include guidelines for safe school design, teacher training, and crisis management.
Crisis Response Coordination: In an interconnected world, crises can have far-reaching implications. Collaborate with neighboring countries to establish protocols for handling emergencies that may impact multiple schools.
Cultural Sensitivity: Recognize and respect cultural differences that might influence perceptions of safety and security. Solutions must be adaptable to various cultural contexts.
Digital Safety: Address the growing concern of online threats to students. International cooperation can lead to the development of strategies to protect students from cyberbullying, online predators, and misinformation.
In conclusion, creating safe schools requires a comprehensive approach that considers factors at the local, national, and international levels. It’s a collective effort that involves the entire community, from students and parents to policymakers and international organizations. By working together, we can build environments where students can learn, grow, and thrive without compromising their safety and well-being.
Hello, dedicated educators and champions of knowledge! As we gear up for another exciting academic year, it’s time to reflect on the lessons learned, the challenges overcome, and the fresh opportunities that lie ahead. The landscape of education is ever-evolving, and in 2023, teachers find themselves at the forefront of this transformation. Whether you’re a seasoned pro or a newbie, here are some key considerations to ponder as you embark on this new journey.
#1: Fostering Inclusivity and Diversity
The world is a vibrant tapestry of cultures, perspectives, and backgrounds, and your classroom is a microcosm of this beautiful diversity. As we step into the new academic year, make it a priority to create an inclusive and welcoming environment for all your students. Embrace multiculturalism through diverse teaching materials, celebrate different holidays and traditions, and encourage open discussions that allow everyone’s voice to be heard. By doing so, you’ll be shaping not only informed minds but also compassionate and empathetic individuals.
#2:Blending Technology and Tradition
The fusion of technology and traditional teaching methods is no longer a distant concept—it’s now a necessity. Embrace edtech tools that enhance learning experiences, from interactive apps to virtual field trips. However, remember that while technology can enrich education, the personal touch of face-to-face interactions and handwritten notes is equally valuable. Striking the right balance between digital innovation and human connection will be a hallmark of successful classrooms in the years to come.As I’ve mentioned in an earlier blog post, post-pandemic teaching is very different to what we did before COVID, mainly due to students becoming disenfranchised and disinterested with independent learning tasks that are heavily tech-dependent.
#3: Nurturing Critical Thinking and Adaptability
In an era marked by rapid change, the ability to think critically and adapt is a superpower. Encourage your students to question, analyze, and approach problems from multiple angles. Assign projects that require creative problem-solving and collaboration. By cultivating these skills, you’ll be equipping your students with tools that will serve them well in an ever-shifting world. Check out this blog post of mine about deep learning strategies for ideas to include more critical thinking in your lessons.
#4: Promoting Mental Health and Well-being
The past couple of years have underscored the importance of mental health and well-being. As a teacher, you’re not just an educator but also a source of support for your students. Keep an eye out for signs of stress or anxiety and create a safe space where students feel comfortable discussing their feelings. Incorporate mindfulness exercises or short breaks to help students recharge. Remember, nurturing their emotional well-being is just as crucial as nurturing their intellect.
5. Flexibility in Assessment and Evaluation
Gone are the days when rigid exams were the sole measure of a student’s progress. Embrace a more flexible approach to assessment, including project-based evaluations, portfolios, and real-world application of knowledge. This allows students to showcase their skills in ways that align with their strengths and interests, fostering a deeper understanding of the subject matter.
Conclusion
As you step into the new academic year and beyond, keep in mind that you are not just imparting knowledge but shaping the future. By fostering inclusivity, embracing technology, nurturing critical thinking, promoting well-being, and adapting your assessment methods, you’re not only equipping your students with tools for success but also inspiring them to become lifelong learners and responsible global citizens. Here’s to a year filled with growth, discovery, and countless “a-ha” moments! Happy teaching! 🌟
We welcome you to join the Richard James Rogers online community. Like our Facebook page and follow us on Twitter for daily updates.
Hello, fellow speaker! Are you ready to conquer the stage and captivate your audience with your words? Public speaking can be a nerve-wracking experience, but fear not! In this blog post, we’ll explore some invaluable tips to help you become a confident and engaging ‘sage on a stage’. So, grab a cup of coffee, sit back, and let’s dive in!
#1: Know Your Audience
Understanding your audience is the first step towards delivering a memorable speech. Research their demographics, interests, and knowledge level to tailor your content accordingly. Speak their language, incorporate relatable anecdotes, and address their pain points. Remember, your ultimate goal is to connect with your audience on a personal level.
#2: Structure Your Speech
A well-structured speech can make all the difference in keeping your audience engaged. Begin with a compelling opening that grabs attention, followed by a clear introduction of your topic. Organize your main points logically, supporting them with relevant examples or stories. Finally, end with a strong conclusion that leaves a lasting impression.
#3: Practice, Practice, Practice
Rehearsing your speech is crucial. Familiarize yourself with the content and practice it aloud multiple times. Pay attention to your tone, pace, and body language. Consider recording yourself or rehearsing in front of a mirror to assess your delivery. The more you practice, the more confident and natural you’ll become on stage.
#4: Embrace Non-Verbal Communication
Effective communication extends beyond words. Pay attention to your body language, facial expressions, and gestures. Stand tall, maintain eye contact, and use appropriate hand movements to enhance your message. Be mindful of your posture and avoid fidgeting. Confident body language will help you establish a strong presence and connect with your audience.
#5: Utilize Visual Aids
Visual aids can reinforce your message and make it more memorable. Use slides, props, or multimedia presentations to complement your speech. However, be cautious not to overload your audience with too many visuals. Keep them simple, clear, and visually appealing, while serving as a visual support to your spoken words.
#6: Engage Your Audience
Interaction is key to keeping your audience engaged throughout your speech. Encourage participation by asking rhetorical questions, inviting volunteers, or using audience polls. Incorporate moments for small group discussions or brief activities to break the monotony. Consider using live quizzes that the audience can participate in using their devices (e.g. Kahoot!, Blooket and Quizlet Live). Remember, an engaged audience is more likely to retain your message. They’ll also be happier and will enjoy themselves during your presentation, and you’ll be more likely to get referrals afterwards.
#7: Connect Through Storytelling
Humans are wired for stories. Incorporate personal anecdotes, real-life examples, or relevant narratives to connect with your audience emotionally. Stories evoke emotions, enhance relatability, and help your audience connect the dots. Make your speech memorable by sharing stories that resonate with your audience.
#8: Be Authentic
Authenticity is the secret ingredient to captivating your audience. Embrace your unique voice, personality, and style. Avoid imitating others or trying to be someone you’re not. Embrace your imperfections and let your genuine passion for the topic shine through. Audiences appreciate speakers who are genuine and relatable.
#9: Handle Nervousness
Even the most seasoned speakers experience nervousness. Embrace it as a natural response and use it to your advantage. Channel that energy into enthusiasm and excitement. Practice deep breathing, visualization, or other relaxation techniques before stepping on stage. Remember, nervousness is a sign that you care, and your audience wants you to succeed.
#10: Seek Feedback and Learn
After each speaking engagement, seek feedback from trusted sources. Analyze what worked well and areas that need improvement. Join public speaking clubs or workshops to refine your skills further. Remember, mastery takes time, so be patient and committed to continuous growth.If you would like to earn a Certificate in Public Speaking, then check out my Powerful Public Speaker programme, which can be delivered online wherever you are in the world (or on-site, if you happen to live in Thailand).
Conclusion
Congratulations! Armed with these public speaking tips, you’re well on your way to becoming an exceptional speaker. Embrace the opportunity to share your ideas, inspire change, and leave a lasting impact on your audience. Remember, every great speaker started somewhere, so don’t let fear hold you back. Embrace the stage, believe in yourself, and let your voice be heard!
We welcome you to join the Richard James Rogers online community! Join us on Facebook and Twitter for regular updates, giveaways of Richard’s books, special offers, upcoming events and news.
In the ever-evolving landscape of education, it is crucial for teachers to empower their students with not just knowledge, but also the tools to become self-regulated learners. Metacognitive strategies provide a powerful framework to cultivate students’ ability to think about their thinking, leading to enhanced learning outcomes. By explicitly teaching metacognitive skills, educators can help students become more aware of their learning processes, develop effective problem-solving approaches, and ultimately become lifelong learners. What follows next are ten practical ways to incorporate metacognitive strategies into your lessons and promote student growth.
#1: Set Clear Learning Goals
Begin each lesson by explicitly stating the learning objectives. Encourage students to reflect on what they already know about the topic and identify what they hope to achieve. This metacognitive approach helps students understand the purpose of their learning and fosters a sense of ownership over their educational journey.One creative way that I advise you do this is by using the Three As technique.
#2: Think Aloud
Model the thinking process by verbalizing your thoughts as you solve problems or analyze information. Demonstrate how to monitor comprehension, clarify doubts, and adjust strategies when faced with challenges. This modeling helps students develop metacognitive skills by providing them with concrete examples of how to approach different tasks.Use my blog post on the Metacognition Cycle if you’re looking for ideas on how to verbalise your thoughts correctly.
#3: Reflect on Learning
Introduce reflective practices, such as journaling or class discussions, where students can express their thoughts, insights, and challenges encountered during the learning process. Regular reflection encourages metacognition by prompting students to evaluate their progress, identify areas for improvement, and consider alternative approaches. This great blog post by Martyn Kenneth describes some excellent self-reflection tools that can be used by students and teachers, so check it out!
#4: Promote Self-Questioning
Encourage students to ask themselves questions throughout the learning process. Teach them how to generate thought-provoking questions that assess their understanding, probe deeper into a topic, or anticipate potential difficulties. Self-questioning helps students activate prior knowledge and monitor their comprehension, fostering metacognitive awareness.
#5: Scaffold Metacognitive Strategies
Teach students specific metacognitive strategies, such as summarizing, predicting, visualizing, and self-monitoring. Provide step-by-step guidance initially, gradually shifting responsibility to the students. These strategies become valuable tools for students to manage their learning independently, fostering critical thinking and problem-solving skills.
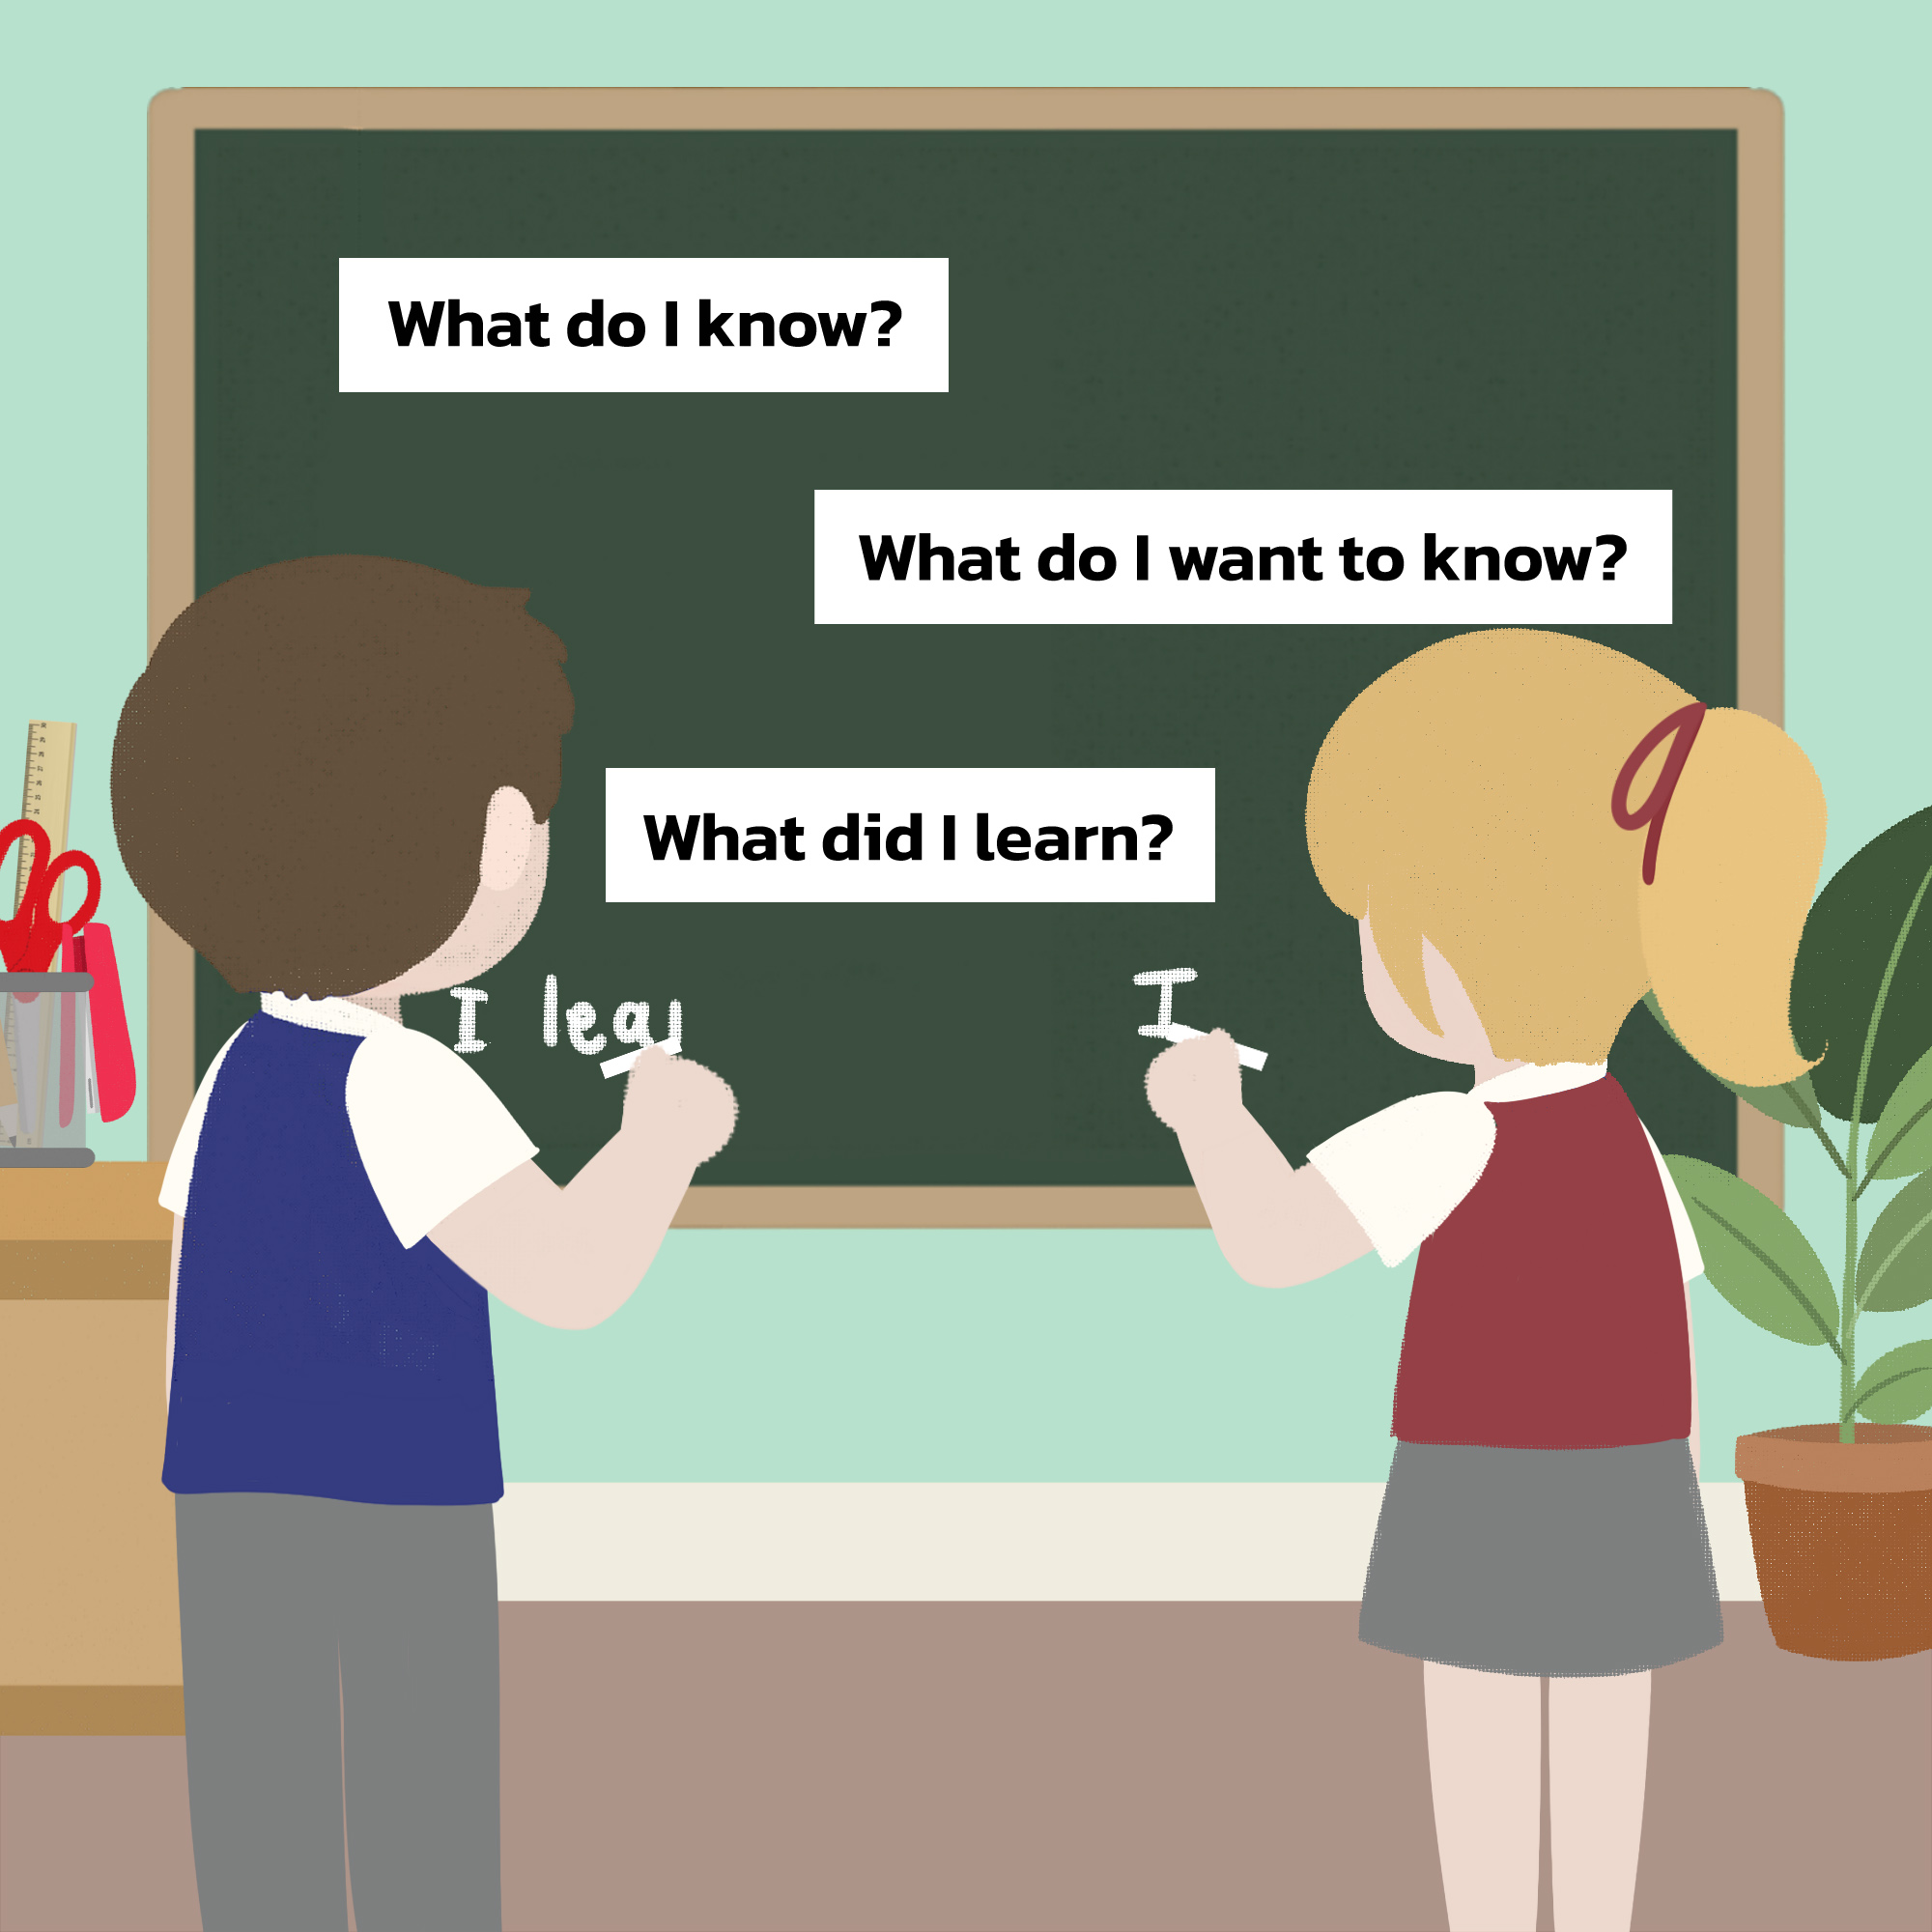
#6: Use Graphic Organizers
Incorporate graphic organizers, such as concept maps, flowcharts, or KWL charts, to help students organize and visualize their thoughts. These visual aids facilitate metacognition by enabling students to connect new information to existing knowledge, identify knowledge gaps, and track their progress. A good place to start for ideas is this blog post on differentiating texts, which provides examples of some types of graphic organizers that can help students to digest large bodies of information.
#7: Encourage Peer Collaboration
Promote collaborative learning activities where students work together, discuss ideas, and provide feedback to their peers. Peer interactions create opportunities for metacognitive dialogue, allowing students to articulate their thinking processes, challenge assumptions, and gain alternative perspectives.
#8: Provide Timely Feedback
Offer constructive feedback that focuses not only on the final product but also on the thinking and problem-solving strategies employed. Help students reflect on their performance, identify strengths and weaknesses, and suggest strategies for improvement. Effective feedback promotes metacognitive development by guiding students’ self-reflection and self-adjustment.
#9: Foster Metacognitive Reading
Teach students reading strategies that enhance metacognitive awareness, such as previewing texts, making predictions, asking questions, and summarizing key ideas. Encourage them to monitor their comprehension while reading, using strategies like self-questioning or visualizing to deepen understanding.Reading can often be coupled with group or self-reflection to encourage deep learning (as opposed to surface learning). Please see my blog post about developing a passion for reading in students, here.
#10: Teach Metacognitive Transfer
Guide students in applying metacognitive strategies across various subject areas and contexts. Help them recognize the transferability of metacognitive skills and encourage their application beyond the classroom, fostering lifelong learning habits.
Conclusion
By incorporating metacognitive strategies into your teaching practice, you can equip your students with essential tools for self-regulation, critical thinking, and lifelong learning. The deliberate cultivation of metacognition empowers students to take ownership of their learning processes, fostering a sense of autonomy and self-efficacy. As they become more aware of their thinking and learning strategies, students can monitor their progress, identify areas of growth, and adapt their approaches accordingly.
Integrating metacognitive strategies into your lessons not only enhances academic performance but also nurtures valuable life skills. By encouraging students to reflect on their learning experiences, set goals, and analyze their own thinking, you are fostering metacognitive transfer—the ability to apply these skills in various contexts beyond the classroom. This transferability prepares students to navigate the challenges of higher education, careers, and personal growth.
All of this promotes deeper engagement and active learning in the classroom. Students who are metacognitively aware are more likely to approach tasks with a growth mindset, embracing challenges as opportunities for growth rather than being discouraged by setbacks. They become more resilient learners, willing to persevere through difficulties and develop strategies to overcome obstacles.
As educators, it is our responsibility to empower students with the tools they need to become self-regulated learners and successful individuals in an ever-changing world. By incorporating these ten strategies into your teaching repertoire, you are setting the stage for transformative learning experiences that will equip your students with the metacognitive abilities they need to thrive academically, professionally, and personally. Embrace the power of metacognition, and watch your students blossom into confident, self-directed learners who are prepared to tackle any challenge that comes their way!
We welcome you to join the Richard James Rogers online community! Join us on Facebook and Twitter for regular updates, giveaways of Richard’s books, special offers, upcoming events and news.
As a teacher, it’s important to have a solid understanding of the principles that underpin effective instruction. One set of principles that has gained widespread recognition is the set proposed by Barak Rosenshine, a former professor of educational psychology at the University of Illinois at Urbana-Champaign. In this blog post, we’ll explore 10 ways you can apply Rosenshine’s principles to your lessons to help your students achieve their full potential.
#1: Start with a clear objective
According to Rosenshine’s principles, the first step in effective instruction is to start with a clear objective. Before you start your lesson, make sure you have a clear understanding of what you want your students to learn.
You may wish to use the ‘Three As‘ to present objectives to the students via a self-discovery process (very powerful). The ‘Three As’ stand for Assign, Analyse and Ask. It’s a simple three-step process for starting each lesson, and allows for the teacher to be as creative as he or she wishes when articulating lesson objectives:
Assign a starter activity, that links to the topic somehow. This can be as simple as a video playing on the screen as the kids walk in, a worksheet or even a learning game.
Analyse the starter activity: This may involve peer-assessing the task, having a class discussion, quick-fire questions or a ‘True or False’ activity
Ask the students: What do you think we are learning about today? This may generate some discussion, but if the ‘Assign’ and ‘Analyse’ parts have been designed properly, then it should be obvious.
For ideas on good starter activities, this blog post is really useful.
#2: Use a variety of examples
Using a variety of examples is a great way to help your students understand the concepts you’re teaching. Use different types of examples, such as visual aids, case studies, or real-life scenarios, to help your students better understand the material.
Different types of examples can help students to better grasp the concepts being taught, as they provide a range of contexts and perspectives from which to view the material. Visual aids, for instance, can be especially effective in conveying complex information in a way that is easy to understand and remember. Case studies and real-life scenarios, on the other hand, can help students connect abstract concepts to real-world situations and make the learning experience more meaningful.
When selecting examples to use in your lessons, it’s important to choose ones that are relevant to your students’ interests and experiences. For instance, if you’re teaching a science lesson on environmental sustainability, using examples that relate to your students’ local community or region can help to make the material more relatable and engaging. Additionally, it’s important to use a mix of examples that are both challenging and accessible. Providing examples that are too easy may bore your students and cause them to disengage from the lesson, while using examples that are too difficult can lead to frustration and discouragement. Striking the right balance between challenging and accessible examples can help to keep your students engaged and motivated throughout the lesson.
#3: Provide guided practice
Guided practice is an effective way to help your students develop their skills and knowledge. Provide your students with opportunities to practice what they’ve learned, but make sure you’re there to guide them through the process.
During guided practice, the teacher provides students with guidance and feedback as they work through problems or exercises related to the material being taught. This can help students to develop their skills and knowledge more effectively than if they were simply left to work independently. Guided practice can take many forms, such as structured activities, group work, or one-on-one interactions with the teacher.
When implementing guided practice in your lessons, it’s important to provide clear instructions and expectations to your students. Make sure they understand what they’re supposed to be doing, and provide them with any necessary resources or materials. Additionally, it’s important to monitor your students’ progress and provide feedback along the way. This can help them to identify areas where they need to improve and make adjustments accordingly. Finally, it’s important to ensure that guided practice is appropriately challenging for your students. Providing practice that is too easy or too difficult can lead to disengagement or frustration. By providing practice that is appropriately challenging, you can help your students to develop their skills and knowledge more effectively.
#4: Use frequent checks for understanding
Frequent checks for understanding can help you gauge how well your students are understanding the material. Use questions, quizzes, or other methods to assess your students’ comprehension of the material throughout the lesson.
Checks for understanding help to ensure that students are comprehending the material being taught and can identify areas where additional support or instruction may be needed. Frequent checks for understanding can take many forms, such as questions, quizzes, or discussions. By incorporating frequent checks for understanding into your lessons, you can help to ensure that students are engaged and actively learning throughout the lesson.Verbal questions are often all that’s needed, just ensure you are not asking the same students to answer. Consider using random name generators (my favorite is the Wheel of Names).Live quiz apps, such a Blooket, Kahoot!, iSpring Quizmaker and others are also great ways to frequently check understanding within lessons, in real-time.
When using frequent checks for understanding in your lessons, it’s important to provide feedback to students on their performance. This can help them to identify areas where they may need additional support or instruction and make adjustments to their learning strategies. Additionally, it’s important to vary the types of checks for understanding used in your lessons to accommodate different learning needs and abilities. For example, some learners may benefit from diagrams or graphic organizers, while other learners may benefit from class discussions or lectures. By using a variety of checks for understanding in your lessons and providing regular feedback, you can help your students to develop a deeper understanding of the material and achieve their learning goals more effectively.
#5: Scaffold your instruction
Scaffolding your instruction can help your students learn more effectively. Start with simpler concepts and gradually increase the complexity of the material to help your students build a strong foundation of knowledge.
Scaffolding your instruction means breaking down complex concepts into smaller, more manageable pieces that build upon each other. This approach can help students to understand and retain information more effectively by giving them the opportunity to build a strong foundation of knowledge before moving on to more complex material. Scaffolding can take many forms, such as providing students with background information, asking leading questions, or providing step-by-step instructions for completing tasks. By gradually increasing the complexity of the material, students can develop their skills and knowledge in a structured and supportive environment.
When implementing scaffolding in your lessons, it’s important to keep in mind the needs and abilities of your students. This means providing scaffolding that is appropriate for their level of understanding and adjusting your approach as needed. Additionally, it’s important to make sure that scaffolding does not become overly restrictive or limiting for your students. While providing structure and support is important, it’s also important to allow students the opportunity to explore and make their own connections between concepts. By striking a balance between structure and flexibility, you can help your students to develop a strong foundation of knowledge while also allowing them the opportunity to think critically and creatively.
#6: Provide feedback
Feedback is an important component of effective instruction. Provide your students with feedback on their performance, both positive and constructive, to help them improve.
I’ve written a LOT about feedback in the past, and there’s lots that we could explore here. However, if I were to distil the essentials into a few bulletpoints, they would be as follows:
State the negatives first, then follow with positives
Use verbal feedback, but make sure the students take action on what you have said
Use time-saving marking strategies which are efficient and effective (e.g., ‘live’ marking, peer assessment, self-assessment and automated assessment)
#7: Use models and examples
Using models and examples can help your students better understand the concepts you’re teaching. Provide your students with examples of how to apply the material to real-life situations to help them make connections.
Models and examples can take many forms, such as diagrams, charts, or simulations. By providing students with concrete examples of how a concept works, you can help them to build a mental model of the concept and understand how it can be applied in different situations. Additionally, using a variety of models and examples can help students to see the same concept from different perspectives, which can lead to deeper understanding and better retention of the material.
When using models and examples in your lessons, it’s important to choose ones that are appropriate for your students’ level of understanding. Providing examples that are too complex can lead to confusion and frustration, while using examples that are too simple can lead to boredom and disengagement. Additionally, it’s important to provide students with opportunities to interact with the models and examples, such as by asking them to explain how they work or to identify different features. By providing opportunities for active engagement with the material, you can help students to develop a deeper understanding of the concepts being taught.
#8: Use a variety of instructional strategies
Using a variety of instructional strategies can help keep your students engaged and interested in the material. Use different methods such as lectures, discussions, group work, or hands-on activities to keep your students engaged.
Every student has unique strengths, and by using a variety of instructional techniques, you can help to accommodate these differences and ensure that all students are able to engage with the material being taught. Some effective instructional techniques include direct instruction, group work, hands-on activities, and multimedia presentations. By varying your approach, you can keep students interested and engaged in the learning process, which can lead to deeper understanding and better retention of the material.
When using a variety of instructional techniques in your lessons, it’s important to keep in mind your learning objectives and the needs of your students. Different techniques may be more effective for different types of learning objectives or for different groups of students. Additionally, it’s important to provide clear instructions and expectations for each technique you use. This can help to ensure that students understand what they’re supposed to be doing and how the technique relates to the material being taught. By using a variety of instructional techniques in your lessons, you can help to create a dynamic and engaging learning environment that supports the needs and interests of all your students.
#9: Review and revise
Review and revise your instruction to ensure that you’re meeting your students’ needs. Regularly assess your students’ progress and adjust your teaching methods accordingly.
Providing opportunities for regular review is an essential part of effective instruction. Review allows students to reinforce their learning and connect new concepts to previously learned material. It also helps to identify areas where students may need additional support or instruction. Regular review can take many forms, such as quizzes, games, or discussions. By incorporating review into your lessons, you can help to ensure that students are retaining the material being taught and developing a deeper understanding of the concepts.
When implementing regular review in your lessons, it’s important to provide opportunities for both formal and informal review. Formal review activities, such as quizzes or exams, can help to provide a structured and systematic approach to review. Informal review activities, such as class discussions or games, can be more flexible and allow for more creative and interactive review. Additionally, it’s important to provide regular feedback to students on their performance during review activities. This can help them to identify areas where they may need additional support or instruction and make adjustments to their learning strategies. By providing regular review opportunities in your lessons, you can help your students to develop a deeper understanding of the material and achieve their learning goals more effectively.
#10: Provide closure
Provide closure at the end of your lesson to help your students solidify their understanding of the material. Summarize the key points of the lesson and provide your students with an opportunity to ask any remaining questions they may have.
Channeling the energy of your students in a healthy and competitive way should be one of the core aims of all plenaries. Reviewing the content and skills learnt in class in a fun, competitive and energetic way can really help with memory and concept retention. Do this consistently each and every lesson and watch your students make tremendous progress as the weeks and months roll by!
By applying Rosenshine’s principles to your lessons, you can help your students learn more effectively and achieve their full potential. Remember to start with a clear objective, use a variety of examples, provide guided practice, use frequent checks for understanding, scaffold your instruction, provide feedback, use models and examples, use a variety of instructional strategies, review and revise, and provide closure.
We welcome you to join the Richard James Rogers online community! Join us on Facebook and Twitter for regular updates, giveaways of Richard’s books, special offers, upcoming events and news.
As teachers, it can be challenging to navigate the diverse groups of students in our classrooms while also upholding the values and principles we believe in. With the current trend of progressive ideologies being pushed in schools, it can feel overwhelming at times to combat ideas that are contrary to our own. However, there are strategies that teachers can implement to promote critical thinking, encourage diverse viewpoints, and foster an open-minded learning environment. Here are some ways to combat ‘woke’, or ‘progressive’, ideologies in schools:
#1: Promote Critical Thinking
One of the most effective ways to combat progressive ideologies in schools is to promote critical thinking. Encourage your students to think independently, question assumptions, and analyze facts. Give them the tools they need to evaluate arguments objectively, and let them come to their own conclusions. Encourage debate and discussion, and create an environment where students feel comfortable expressing their viewpoints without fear of judgment or ridicule.
Here are some good resources that can help you facilitate the critical thinking process in your lessons:
Another way to combat progressive ideologies in schools is to teach the value of diversity. Encourage your students to appreciate different cultures, religions, and perspectives. Emphasize the importance of tolerance and respect, and create opportunities for your students to learn from one another. When students understand the value of diversity, it becomes harder for progressive ideologies that promote exclusivity to take hold.
#3: Encourage a Growth Mindset
Progressive ideologies often promote victimhood, entitlement, and a lack of personal responsibility. To combat these ideologies, teachers can encourage a growth mindset. Teach your students that they are capable of achieving anything they set their minds to, and help them develop a sense of personal responsibility for their own success. Encourage them to embrace challenges and see failures as opportunities for growth.
Here are some resources that can help you get your studentsto adopt a growth mindset:
To combat the influence of progressive ideologies in schools, it’s important for teachers to help students develop strong values. Encourage your students to think about what they believe in, and teach them the importance of virtues such as honesty, integrity, and respect. When students have a strong sense of values, they are less likely to be swayed by ideologies that conflict with their beliefs.
#5: Stay Informed
Finally, it’s important for teachers to stay informed about the progressive ideologies that are being promoted in schools. Attend workshops and seminars, read blogs and articles, and participate in discussions with colleagues. By staying informed, we can better equip ourselves to combat these ideologies and promote a learning environment that is free from political bias.
Conclusion
In conclusion, it’s possible to combat progressive ideologies in schools by promoting critical thinking, teaching the value of diversity, encouraging a growth mindset, helping students develop strong values, and staying informed. As a teacher, it’s our responsibility to create an environment that fosters intellectual curiosity, promotes debate and discussion, and encourages students to think independently. By doing so, we can help our students become well-informed, thoughtful, and responsible citizens who are able to make a positive impact on the world.
We welcome you to join the Richard James Rogers online community! Join us on Facebook and Twitter for regular updates, giveaways of Richard’s books, special offers, upcoming events and news.