The ability to learn independently is a key aspirational skill of all of our students; or at least it should be.
Not only do our top students need to learn how to study independantly when they get to university, but all of our students need to be prepared for careers that may not yet exist.
Empower students through marking
When you first meet your advanced learners, or when they are starting out on their ‘independent learning training’, empower them with encouraging comments on their work.
Take this recent example of mine for instance:
“Excellent advice!”
This work is from a final year IBDP student. She’s done a good job of finding and filtering relevant information by herself. I’ve praised the things she’s done well, and offered tips on how to extend her research.
Over time, the amount of written comments I give on this kind of project work/research will definitely decrease. This is only needed in the initial stages.
For her next piece of work, peer assessment and some verbal feedback from me may be all that she needs to be encouraged to keep on track and continue to improve.
Design project work with a creative outcome in mind
Here are some ideas for group and individual projects:
Create an infographic about a particular topic, to be displayed on the classroom wall
Create a class presentation, perhaps on Google slides, to be presented to the class at some future date
Create a website summary of a topic
Build a model or a demo to show the class
Create a dramatized play/news report about a topic
Create a song/rap
Create a stop-motion animation of a process
Create a spatial Learning activity (kids might need some training for this one: see my blog post here for help)
Create a leaflet or brochure, to be distributed to another class or Year group (cooperate with other teachers on this one – perhaps a leaflet exchange is a good idea)
Can you think of more to add to the list?
Use Imaginative Evaluation
When people think of an ‘evaluation’ they’re often drawn to their early memories of their Science lessons at school.
In those kinds of evaluations students have to decide what worked well, what didn’t work well and what changes could be made to methods and equipment to make the experiment better next time.
With Imaginative Evaluation, students use their ingenuity to think of what they could do better if there were no limitations in terms of equipment, time, resources and technology.
In an attempt to create the innovators of tomorrow, Imaginative Evaluation aims to get kids thinking about what technology, currently not available, that they would invent to solve the problem they’re facing.
This excerpt from my book shows a planning and evaluation form that can be used with any assignment, in any subject, to encourage Imaginative Evaluation:
Build things
Get your students to build what they are learning in some way. You don’t need fancy equipment: straws, bottle caps, crumpled paper, cardboard, paints and even plastic bottles can all be mashed and mangled together by students to create amazing models.
I’ve used this technique across my teaching in Science to get students to create everything from atomic models (a recent example is given below) to makeshift ‘eco gardens’.
Can you think of times where you could use this technique in your curriculum area?
We welcome you to join the Richard Rogers online community. Like ourFacebook page and follow us on Twitterfor daily updates.
It was a cold October morning in North Wales. I was a fresh, Newly Qualified Teacher at Denbigh High School.
Young and inexperienced with rose-tinted goggles: I was mindful of my responsibilities as a new Science teacher. Expectations were high.
When the Deputy Head of the school suddenly asked to observe one of my Year 9 Physics lessons I knew I had to perform well. As a thriving school with a great reputation, Denbigh definitely set the bar high.
My Year 9 kids were typical 13 and 14-year-olds. Some days they were great and some days they’d just had enough. Keeping them on-task was a challenge for an unskilled teacher like me.
Frantically thinking of ideas for this major lesson observation that was coming up, I thought about how to keep the kids interested whilst maintaining challenge at the same time. I was going to be teaching a lesson about series and parallel circuits, but I’d made the mistake of not ordering circuitry and equipment from my Science technician. A class practical was simply out of the question at such short notice, and the circuitry was booked by a number of other teachers that day anyway. I could only order enough equipment for a class demo.
What on Earth was I going to do?
“An AMAZING book! 5 stars!”
Simulations and online learning was out of the question – this was 2006 and kids didn’t have the right mobile devices and they didn’t carry laptops. Online resources were also limited.
I felt uneasy about taking the kids to the computer lab, even though it was available. My Deputy Head wanted to see me teach, not watch the kids work on computers for 40 minutes (or so I assumed).
In a moment of despair and perplexity I was suddenly given a flash of inspiration: what if I could turn the lab into a giant circuit? The kids could become ‘model electrons’ and could walk around the classroom holding up little signs, pretending to be flowing around a circuit. I could even hold up a sign saying ‘cell’, and a few kids could be model ‘switches’ and ‘bulbs’. Hell, it might just work!
The day comes
I frantically printed a class set of A4 signs – just simple sheets which said ‘electron’, ‘switch’ and ‘bulb’ in big letters.
‘This crazy idea might save my day after all’, I thought!
The kids came in and sat down. Back then I hadn’t mastered the art of giving students something quick to do as soon as they enter the door (see my three A’s in my book). I got right into this activity as a starter (which turned into a semi-main body of the lesson).
I lined all the kids up and gave them each a sign. Most of them would pretend to be electrons and a few would be switches and bulbs (‘switch on’, ‘switch off’, ‘bulb on’ and ‘bulb off’ signs were given to these pupils).
The desks were arranged in rows, so I started with a series circuit. I explained the route the kids had to take and they started walking, holding up their signs. They smiled and giggled along the way. When the ‘electrons’ passed the ‘bulb’ it ‘lit up’, and when the ‘switch off’ student held up his sign, the ‘electrons’ stopped moving and the ‘bulb off’ sign was held up, proudly.
To my astonishment, the kids absolutely loved it. More importantly: they understood the concepts of the lesson brilliantly. They completed a short worksheet after the ‘circuit walk’ (which they all could answer with ease) and then I gave my short circuit demo with actual wires and bulbs and switches.
Feedback
My deputy head was very impressed. She praised my creativity and said that the ‘circuit walk’ was very effective.
Not bad for a freshy who prepared in rush!
That day I became a hardcore Spatial Learning fan. Fast forward to today and all of my students will tell you that I use spatial learning in almost every lesson I teach. It’s effectiveness speaks for itself.
But what is Spatial Learning?
There are many definitions and interpretations of spatial learning on the web and in various books. Some of this pedagogical mumbo-jumbo can be really confusing, but I believe I’ve nailed it down to one sentence:
Spatial Learning is when students use bodily movements to express themselves, solve problems and model situations.
Spatial Learning has both general and specific applications. I’ll now go through some great examples that illustrate the power of this excellent teaching tool.
Here’s a quick video I made about Spatial Learning:
A human graph and true or false?
Do you want to know the opinions of your students on a subject matter? Maybe you’re taking a survey (e.g. which day is the best for canteen food). Maybe you have a list of multiple choice questions and you want a fun way to get the kids through them.
A human graph might be the right tool for you!
What if you just want to quickly check your students’ conceptual understandings (e.g. as a plenary)? You could ask some true/false questions and get the kids to raise their hands, or you could use a way cooler (and more fun) method!
Choose one wall to be the ‘True’ wall and one to be the ‘False’ wall. Once you’ve asked the question, get the kids to walk to the correct wall. It’s that simple! Just make sure that the kids walk back to the middle of the classroom before each question.
This great illustration from Pop shows you the steps to take for each of these activities:
Body numbers
Do your kids need to express numerical answers sometimes? Maybe they need to work out a percentage or a fraction, or translate numbers from one language into another. Maybe they need to express something in Binary Code. Well it’s time to put pen and paper down and get your kids moving!
Turn your students into ‘human numbers’ by following Pop’s beautifully illustrated instructions:
For double and triple-digit numbers you can put students into groups for added fun!
Modelling
The vast majority of the Spatial Learning I do involves modelling a situation, concept or solution. Like the example I gave earlier about the electrons travelling around the circuit, the students actually become the things that you’re teaching about.
Ifind that almost everything I teach can be modelled spatially in one form or another.
I’ll provide some examples to show just how easy it is, with just a little creativity, to turn any monotonous textbook paragraph into a living, breathing, exciting and stimulating task.
Modelling example one: Diffusion
Textbook definition:Diffusion is the passive movement of liquid or gas particles from a region of high particle concentration to a region of low particle concentration. The speed of diffusion of any given particle is dependent on its molecular mass. This means that a particle of ammonia, for example, will diffuse faster than a particle of hydrogen chloride as ammonia is the lighter of the two particles.
Modelling activity:As you can see, the textbook definition is rather hard to swallow.So, to jazz things up a little, you can turn the students into ammonia and hydrogen chloride particles and tell them to diffuse! In this activity, the students simply walk across the classroom at different speeds, depending on which molecule they are. Quick, easy to do and a nice break from writing, reading and listening to a lecture. More importantly: it’s really useful as a tool to help kids understand this concept.
See this illustration I drew below (my art work is dire compared to Pop’s, so I hope it’s understandable!):
Modelling example two: A Typical Home Network
In an attempt to show you just how pliable spatial learning is, I’ve designed a task for a subject area I don’t specialise in: ICT
Concept:A typical home network may be wired, wireless or a combination of both. Hardware components process and convey the data message from from part of the network to another.
Spatial learning task:For this task you need moving and stationary students. The stationary students stand at predetermined positions in the classroom (you can put signs on desks or on walls to help). These students represent the hardware. The rest of the students are the ‘data message’, and they move from one component to another. I hope the illustration below helps you to see just how easy this is to implement and how much fun it can be. Students should shout out the name of the hardware component they reach at each stage as they walk around the room.
Can you think think of ways to use modelling in your subject area?
Further reading
Mydebut bookis filled with great spatial learning and active engagement tips. After the enormous success of that book I’ve decided to work on a new book that will be released mid-2018 which goes into even greater depth and breadth about the range of classroom management tactics available to teachers. Also, if you’re looking for a great book to build up spatial learning skills in small children, then I strongly recommend Julie Dillemuth’sLucy in the City:
“Feedback functions formatively only if the information fed back to the learner is used by the learner in improving performance.” Dylan Wiliam, Embedded Formative Assessment
A half-term has ended and so much has happened already! New students, new classes, new systems, new parents and maybe even a new school.
If you’re like me: following a British/American academic year, then you’ve probably given your older kids some mid-term exams. In my case, I’ve already had a parent’s consultation evening in which I could discuss the results.
This time of the academic year is a great opportunity to assess your students in some way. It allows you to identify problems early on, so that you can ‘nip them in the bud’, so to speak.
“An AMAZING book! 5 stars!”
One key problem area for many students is their use of subject-specific language in examinations. Mark Schemes for external exams, such as iGCSEs, GCSEs, ‘A’ – Levels, the IB Diploma and many others, are often very rigorous with no room for compromise when it comes to key words.
In short, if students don’t use the correct subject-specific terminology, then they perform poorly in examinations. This is a problem that native English speakers often face, as well as students with English as an Additional Language (EAL).
What follows next are my top three strategies for helping students learn key words. I hope you find them useful, and if you have any strategies that you really like then please do comment using the form at the bottom of the page.
#1: Vocabulary Journals
I already have a number of students who I’ve identified as needing one of these. It’s such an effective way to boost confidence and performance, but it does require a bit of organisation and leadership from the teacher. Here are the steps:
Step 1:Tell the students to get a special notebook. It doesn’t need to be fancy. Just a cheap spiral bound one will do just fine.
Step 2:The students should divide the first page into three columns:
Key word
Meaning
Pronunciation
For example: Moment, The force applied to a lever multiplied by the distance from the pivot, mo-men-t
For an EAL student you can include a fourth column:
Translation
In this column, the student can write the word in his/her native language.
Step 3:The students should write down the key words they learn every week into this journal, along with all of the other information.
Step 4:CRUCIAL! The key words and information must be CHECKED every week. Check the words, the meaning and the pronunciation (you can even get the students to say the words to you – this reinforces their memory of the terminology).
For native translations you may have to simply trust the students with that one. You could possibly spot check these every so often with an MfL teacher, but that’s not always possible (e.g. if the native language of the student is Japanese, but the school doesn’t have a Japanese teacher).
To save you time, you could get small groups of students to check each others’ journals. This would also work well with groups of EAL students who all speak the same native language.
JOUNALING IS SUCH A POWERFUL TEACHING TOOL, BUT IT IS SELDOM USED BY TEACHERS! Make use of it!
#2: Play Vocabulary Games
I’m a HUGE advocate of these. They are so much fun, and can be used by students of almost any age! Here are may favorites:
Splat
This quick game is so easy: all you need is a whiteboard, whiteboard markers and class of kids. It’s a great game for consolidating key vocabulary, and is perfect for E.A.L. learners.
Here’s a short video showing a quick clip of me playing ‘Splat’ with my students (I will include some more lengthy clips soon, but this is a good start):
Mystery Word
Another easy game. This time, students randomly pick out written words from a hat (or cup, beaker, container, etc.), and then they have to explain their word to the class (without saying the word). The students who are listening have to guess what the word is.
Who am I?
A very simple game. All you need are post-it notes and a class full of energized students! Great fun. Perfect for reinforcing key vocabulary and concepts.
There are some more games that you can play with too (no pun intended). Details can be found at my blog post here. Also, if you’re looking for a great book filled with practical and easy-to-implement vocabulary games, then check out this great book (one of my favourites): Vocabulary Games for the Classroom by Lindsay Carleton and Robert J. Marzano.
#3: Highlight key words in your marking
There’s a number of ways that this can be done:
Refer to key words by writing questions on the piece of work (e.g. what’s the name of this part?)
You could highlight less technical terminology and get the students to make it more technical (e.g. ‘movement energy’ becomes ‘kinetic energy’)
You could circle key words that are spelt incorrectly and get the kids to look them up online or in a dictionary, and change the spelling
You could do some peer assessment and get all the kids to write down words spelt or written incorrectly on little bits of paper. These words can then be your ‘feeder vocabulary’ for the games given above.
Your school may have it’s own strategy for key words, so check that first!
We welcome you to join the Richard Rogers online community. Like ourFacebook page and follow us on Twitter for daily updates.
Illustrated by Pop Sutthiya Lertyongphati (a former student of mine, and a key illustrator in mybook). You can e-mail her at popslittlespace@gmail.com if you’d like her to do some beautiful illustration work for you!
The start of a new academic year at any school is usually very hectic, especially if you’re starting somewhere new. With fresh classes, new systems, new students, new workload demands and a new timetable, it’s easy to become overwhelmed.
Falling behind on your teaching schedule (i.e. the topics you’re supposed to cover and when), is easily done. Sometimes it’s unavoidable, like when the floods hit Bangkok in 2011 and schools were closed for two weeks, or when you have to go on a residential or field trip. Sometimes it’s a symptom of getting used to life at school, and adapting to new changes.
Don’t feel guilty
Falling behind schedule happens to every teacher at some, or multiple points, in our careers. Don’t beat yourself up – accept what’s happened and use the prevention and cure strategies in this article to solve the issue quickly and easily.
Fundamentals: The Curriculum Map
In order to know whether you’re behind schedule in the first place, you’ll need curriculum maps set up for each of your classes.
A curriculum map is basically a long-term plan for each class for the whole academic year. It doesn’t have to be fancy – even a table drawn on paper is enough. However, a good curriculum map should show the topics you intend to teach each month, or week, of the academic year. These topics should be linked to the textbook you are using in class or the syllabus you are following or both.
A curriculum map doesn’t need to be complicated
Once your curriculum maps are set up, and you know what you should be teaching and when, you can start using these prevention strategies which will enable you to keep on schedule for the rest of the year.
Prevention Strategies
These can be used at any point in the year, as you may be behind, or ahead of schedule (a topic for another blog post?), at multiple points during the academic year.
Set time aside each week to plan ahead
When I first qualified as a teacher I used to plan my lessons day-by-day. This was not a good strategy, as I found it hard to gain a long-term focus for my planning, which sometimes caused me to fall behind.
Now I set aside time every Sunday afternoon to plan all of my lessons for the week ahead. However, I don’t just simply scribble activities into each and every box in my planner. I ask myself these five questions for every class:
Let’s take a look at the curriculum map. Am I on schedule?
Where are the kids up to now?
Where do they need to be by the end of the week?
Has anyone missed any lessons (including me?). How can we catch up?
Which new activities or games should I use this week, which I haven’t used for a while? (Great ideas for learning games and differentiation tips can be found here, here and here).
Going through these five steps allows me to not only plan lessons which are enjoyable, tailor-made and meaningful, but also allows me to keep up with the pace of the curriculum.
I addition to this, some extra strategies are sometimes needed to fully answer to above five questions. Let’s take a look at those strategies now.
Set up a marking timetable
I know this is probably not a popular way to phrase a sub-heading, but please stay with me and you’ll see the immense benefits that this strategy has.
For this current academic year, I am teaching 8 different classes. Obviously, I see those classes at different points during a typical week, so I spread out my marking as follows:
Year 11 on Monday
Year 9 and 10 class 1 and 2 on Tuesday
Year 13 on Wednesday
Year 7 and Year 10 class 3 on Thursday
Year 12 on Friday
Okay, so you get the idea of what a marking timetable looks like. How does this help you to keep your teaching on schedule?
You’re constantly checking the students’ books to see if they have covered exactly what you think they’ve covered. Sometimes it can be easy to lose track of where your kids are at, especially if you have multiple classes to teach. Sometimes planner or VLE (Virtual Learning Environment) records are not enough – you need to check if the kids have actually UNDERSTOOD what you taught them.
It doesn’t take long to do if you do it each day and spread it out. A quick glance may be all you need to see where the kids are at.
My grandad was a very keen and competent gardener. He lived by theLittle And Often Principle: “I do a little bit of gardening, every day, so that I don’t have a load of weeding and pruning to do every Sunday”is what he used to say.
I like that idea.
Make sure that your marking timetable fits in well with your school’s homework timetable (if they have one) and your free-time.
Other benefits of having a marking timetable are as follows:
You’ll get to know the writing, presentation and artistic styles of your new students really quickly.
Checking through the students’ books and homework yourself is one way to quickly memorise new names
It allows opportunity to provide written and verbal praise, which helps you to build rapport
Set meaningful and robust cover work
Whether you’re out on a school trip, ill with the cold or attending PD overseas, your cover work should aim to minimise re-teaching when you come back.
Some teachers fall into the common trap of setting work that keeps students occupied or entertained, rather than work that challenges the students or covers new material.
It is understandable why some teachers are reluctant to give new content as cover work – if you’re a subject specialist who’s away from school, then it’s likely that your class will be supervised by a non-specialist.
But does that mean you should make your cover work easy?
If you want to avoid being behind schedule, then set cover work that covers some of the syllabus that the kids would normally learn if you were at school.
For example, I was just recently away for three days on an Outdoor Expedition trip. I asked my Year 12 class to complete the End of Chapter questions on Atomic Structure – a challenging task since they haven’t quite learnt everything about successive ionization energies yet. When I go back to school tomorrow, I’ll check their books to see how far they got and to see if they could do the successive ionization energies question.
If they could all do it, then congrats – the kids have taught themselves some new knowledge whilst I was away. I can quickly go through that question and move on.
If some couldn’t do it, then I’ll take those individuals aside during a class activity and go through it with them.
If they all couldn’t do it, then I know that my cover work was too challenging (or the kids chose to slack off whilst I was there). However, now that I know the kids really well, I can gauge that my cover work wasn’t too challenging (a skill that takes experience to master). If all of the kids couldn’t do it, then I’ll have to spend time to teach that topic to them again.
Bottom line – Cover work should aim to teach, not just to entertain.
Keep spares
A basic one this, and more for individual kids who have missed classes.
If you’ve handed out worksheets or paper-based homework in class, then keep the same sheets in some kind of filing cabinet or folder. When the kid comes back, you can hand him or her the work that he or she needs to catch up on.
Even better – put everything on a VLE. Good systems include Google Classroom® (which is virtually free of charge), Firefly® and Moodle®.
Stick to the syllabus
We all want to enrich our lessons with real-life examples, practical work, field-trips, case-studies and projects (which are all great and all have their place in teaching). However, it can be easy to get carried away a bit.
I made the mistake of doing this in my NQT (Newly Qualified Teacher) year – my first year of teaching. I was going through genetic diseases with a Year 11 Biology class, and I decided to teach them about Huntington’s Chorea when it wasn’t on the syllabus.
“An AMAZING Book!”
Whilst it was nice for these kids to have another example of a genetic disease in their toolkit, and they found it interesting too, they weren’t going to be examined on it. I basically wasted a lesson teaching them this.
The odd lesson here or there of additional material isn’t usually a major problem, but large periods of time need to be considered more carefully. Do your kids really need one week to complete a recycling project, or will one lesson give them enough material for their test or exam?
Plan your enrichment material carefully. Make sure it fits into your curriculum map without disrupting the flow of the main syllabus content. Ideally, enrichment activities should embed and enhance the curriculum, not digress from it.
Use focussed resources
Have you ever produced a worksheet or resource that was designed for a slightly different course, but you had little time so you set it anyway? I’ve done this in the past, especially when I was just starting out as a teacher, and it usually has one or more consequences:
There will be a question or two that the kids can’t do, and you’ll need to spend extra time explaining the theory behind those questions
The kids may spend too long on the worksheet or activity, eating into valuable teaching time
The kids will get confused about what they actually need to know, and what they should revise for their test or exam
There is a flip-side to this though – some resources designed for the same topic but other exam boards can be used as extension material – stretching you’re best learners to excel in the lesson. Just be sure to specify though – “Everyone should do questions 1-5 in 10 minutes. Questions 6 and 7 are bonus questions if you finish early”
Behind Schedule Cures
But what if you’re already behind schedule (whether or not it is your fault)? How do you get back on track?
Play accelerated learning games
There are some activities you can do in class which speeds up the amount of content learnt per lesson. My two favourites aremarketplace activities, and the Poster Game (given below).
Possibly the most fun and competitive game I’ve ever invented for teaching new content. You’ll need space for the kids to walk/run, and the game does take some prep. However, once you (and your students) become used to playing this game you’ll find that it’s a doddle to set up in no time at all.
Set homework
Can some of the simpler stuff be given as homework? If you’re behind schedule with your teaching, then this could prove to be a useful tactic. Just be sure to check the work quickly to make sure that no-one is left behind.
Sharing a class? Speak to your partner!
If you share a class with another teacher, then be open and honest and tell them that you are behind schedule. Two heads are better than one, and together you may be able to find a creative solution to the problem (e.g. the other teacher might be able to cover the missed material, while you progress to the next topic).
Assign extra time
This might be your only option if you are far behind and exams are approaching. Sometimes this happens through no fault of our own, and sometimes we’ve just gone too slow (which could be the result of multiple causes, some of which may be beyond our control).
You may need to find out when all of your kids are free, and give them some extra sessions. After school, lunchtimes, school holidays and weekends can often be used.
The last resort, but still an option.
Speak with your head of department
If you are really struggling to keep up and are finding that the pace of your lessons is not adequate to meet the demands of the curriculum map (despite trying the tactics I’ve mentioned), then speak with your line manager as soon as possible.
You’ll be seen as more mature, focussed and trustworthy by owning up to the problem than trying to sweep it under the carpet. What’s worse – a discussion with your HoD at the beginning, or multiple problems towards the end the academic year?
Your HoD should sympathize with you and offer a suite of solutions, some of which you may never have thought about. You may be going too slow because behavior management is taking up too much time, or maybe your kids just find learning a challenge in general.
Speak up and don’t be afraid. You’ll be respected for doing so.
We welcome you to join the Richard Rogers online community. Like ourFacebook page and follow us on Twitter for daily updates.
Illustrated by Pop Sutthiya Lertyongphati (a former student of mine, and a key illustrator in mybook). You can e-mail her at popslittlespace@gmail.com if you’d like her to do some beautiful illustration work for you!
So you’ve been at school for a short while. You’ve settled in, got to know some (maybe all?) of your new students and are using the school’s new systems. You’re hopefully getting settled in and used to the new routine.
That’s great!
This article is designed to be a self-check for you – to see if you’re on track and doing the very best things you can do to be effective as you start the academic year.
#1 Professional Intelligence Gathering
A large part of your time has probably already been spent trying to get to know your new students. I’ve personally just started at a brand new school, so all of my new students really are, well, new.
A good way to quickly get to know your kids is to do some professional intelligence gathering. I wrote about this last week, so hopefully, you’ve already got your notebook set up! ;-D
To cut the explanation short, you should get a notebook and keep all non-confidential information about each student you teach in there. Write down their dreams, aspirations, hobbies, ECAs, talents and significant events that have occurred, or that are coming up in their lives.
This information can then be used to generate good professional rapport – the key cornerstone of all great teaching. Kids will learn most effectively when they like and respect their teachers. There’s only one way to get your kids to like and respect you – build up a rapport with them.
Use your professional intelligence to:
Strike up conversations with your new students during lessons when activities are happening or even at impromptu times such as when you’re on duty or walking around school. This will show that you’re interested in their wellbeing and that you remember what they’ve said. Kids and young adults love being listened to and, deep-down, they all want to recognised and admired for their skills and abilities.
Inform your lesson planning by dividing the class into skills groups for activities, or even link the hobbies and interests of your kids to the content.
Speak with students when they slip up or fall behind. I remember once having a one-to-one conversation with a 17 yr old boy who wanted to be a restaurant manager one day. His attitude and focus had been slipping in class, so I had a one-to-one chat with him. I reminded him of the dream and goal he once told me – that he wanted to be a restaurant manager. The effect was profound and deep, and he quickly put himself back on track.
#2 – Settling-In Assessments
“The book that transformed my teaching!”
If you’ve got new kids doing new courses, then you’ll need to know their strengths and weaknesses.
I recently gave my IB Year 12 Chemistry students a full IGCSE exam to act as a baseline test for the course. It allowed me to quickly identify students who needed help so that I could start tutoring and support measures to get these kids up to the right standard. It also helped me to see who the high flyers are so that I can prepare suitable extension work to push these high-achievers.
Get some kind of assessment done at the start of the year. It will provide valuable intelligence which you can use to inform your lesson planning and feedback.
#3 – Extra Curricular Activities
Getting involved in your schools ECA programme is a great way for you to get to know your kids, some of which you may not teach in your mainstream curriculum. It also sets you aside as a contributor to the school community, which reinforces the level of trust that your students will have in you (and you’ll need to build trust quickly if you’re at a new school, or teaching new kids).
Think of things that the kids will enjoy and benefit from:
Sports
Languages
Special certification courses (e.g. CREST Award, Duke of Edinburgh’s Award, St. John’s Ambulance First Aid, etc.)
Crafts
Music
ICT clubs (e.g. coding, animation, game design, app building)
#4 – Marking
Not everyone’s favourite but, nevertheless, a staple for the new teacher at a new school. Last week I wrote about how your first few weeks should involve slightly more teacher-led marking than peer, automated or self-assessment because:
You’ll quickly get to find out about your kid’s strengths and weaknesses (e.g. classwork presentation, homework completion, creativity, numeracy, language proficiency) which can all go into your professional intelligence notebook?
You’ll learn new names more quickly
It’ll give the parents a good impression of you when they see your comments on their kids’ work
It can be used as a POWERFUL opportunity to provide sincere and meaningful praise, which will empower your students right from day one
Read my blog post here about marking and assessment strategies if you’d like some advice or ideas for ways to implement this key strategy.
#5 – Have Energy
Are you pumped up for every lesson? Do your kids see you as enthusiastic and upbeat, or just an old bore?
Sorry for the direct statement, but it is important to make the point that ENERGETIC TEACHERS MAKE THE BEST TEACHERS.
Of course, you’ll be adjusting your activities and intensity to suit each year group (post-16 kids need more content delivered per unit time than younger kids, for example), but your energy should be high every single lesson.
Here are some tips for you to create high-energy lessons, every time:
Play Games
I mentioned some learning games last week that will help you to get to know your students (‘Mystery Word’, ‘Splat’ and ‘Who Am I’), but there are so many that you can play on a regular basis.
Here is a high-energy clip of me playing some learning games with my kids in China:
I’m currently in Week 6 at my school and my kids are already trained up and loving a variety of games that I play with them. They’re all easy to do, are inexpensive, provide deep learning and keep the students interested and focused.
As well as the games I mentioned last week, try the following high-energy lesson transformers!:
The Poster Game
Possibly the most fun and competitive game I’ve ever invented for teaching new content. You’ll need space for the kids to walk/run, and the game does take some prep. However, once you (and your students) become used to playing this game you’ll find that it’s a doddle to set up in no time at all.
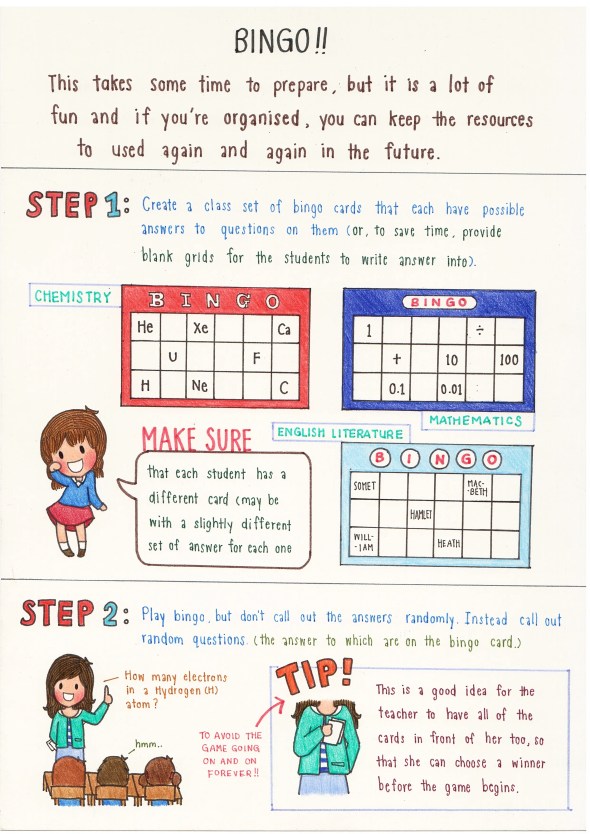
Bingo
Got some equation symbols or mathematical problems to teach your kids? Perhaps the symbols of the periodic table is more your thing? Whatever it is, this simple game can be adapted to suit any subject.
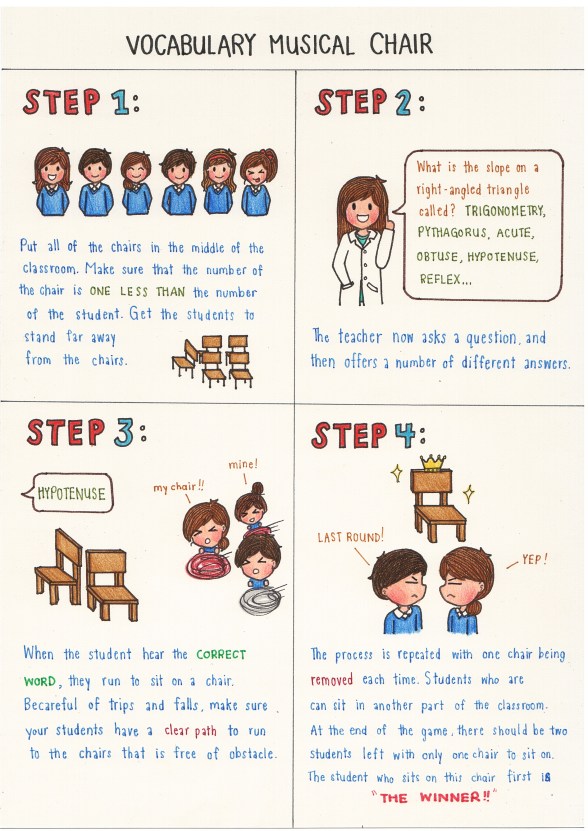
Vocabulary Musical Chairs
You’ll need a good rapport with your kids to use this one, as it needs to be controlled really well by the teacher (e.g. to avoid kids bumping into each other). However, it is simple, fun and worth the effort!
Mystery Picture
This one takes some imagination on the part of the teacher and some training of the kids beforehand. However, it’s really, really good for encouraging higher order thinking skills.
Be Eccentric
You’ll come across as boring and monotonous if you aren’t, well, yourself.
You don’t need to put on a fake persona. Be wacky and quirky and be yourself (just don’t break any school rules – obviously).
One thing I love to do is sing and rap to my kids. They love it! I also use voice inflexions and funny noises to make the content a bit light-hearted and funny. It loosens up the mood in the room and gets the kids giggling a bit.
One thing that I’m a big fan of is modelling. No, not the cosmopolitan cat-walk modelling, I mean getting your students to BECOME THE CONCEPT YOU’RE TEACHING.
Just last week I had my kids stood in circles and spinning, pretending to be electrons orbiting a nucleus. The week before they were spreading around the room randomly pretending to diffuse like gas or liquid particles would.
The possibilities for modelling are endless. Here are some ideas that can be applied to any subject:
We welcome you to join the Richard Rogers online community. Like ourFacebook page and follow us on Twitter for daily updates.
Illustrated by Pop Sutthiya Lertyongphati (a former student of mine, and a key illustrator in my book). You can e-mail her at popslittlespace@gmail.com if you’d like her to do some beautiful illustration work for you!
Updated August 2022
Accompanying podcast episode:
The first few weeks of a new academic year can be really challenging, not least because you’ll have a lot of new names to remember!
Whether you’re a new teacher working in a completely new school, or whether you’re simply rolling into a new academic year with new classes to teach, this article will help you.
Strategy 1: Gather Intelligence
Knowing your students on a deep level is a fundamental principle of rapport building. You need to know ALL of your students’ dreams and aspirations, strengths and weaknesses and other relevant information (such as issues at home or Special Educational Needs).
This kind of knowledge or ‘intelligence’ can even be used to inform your lesson planning. See the examples I included in my book and at Angela Watson’s great Cornerstone for Teachers site here.
Unfortunately, however, few teachers truly utilize the power of professional intelligence gathering.
The best way I’ve found to gather such knowledge is by getting a fresh notebook and setting a page aside for each student you teach. On each page write down important (but not confidential) information about each student – e.g. the ECA’s they do, their career goals, subject-area strengths, competitions they’re entering or have won, etc.
The information you gather can be used to:
Inform lesson planning so that content is made more relevant to individual students, and the group, than it normally would be
Trigger conversations in leisurely school settings such as at the lunch queue, when you’re on duty or when you’re supporting students in a mentoring or pastoral role
Provide fuel for you to reinforce the credibility and brilliance of the students’ personal goals, so that a ‘hypnotic rhythm’ of focus empowers each student tofulfill their goal
Strategy 2: Marking
In your first few weeks it might be a good idea to get a lot of marking done, especially for your new students.
Whilst you might normally do peer-assessment, self-assessment and automated assessment tasks throughout the main body of the academic year, it is worth spending a bit of extra time at the beginning of the year to do traditional, teacher-led ‘red-pen on paper’ marking.
Benefits of this strategy include:
You’ll get to know the writing, presentation and artistic styles of your new students really quickly.
Checking through the students’ books and homework yourself is one way to quickly memorise new names
It allows opportunity to provide written and verbal praise, which helps you to build rapport
My Head of Science recently started a ‘Science Stars’ notice-board at school. Every few weeks the Science teachers pin up some examples of beautiful work. What a great way to celebrate the success of your new students whilst getting to know them and build rapport with them at the same time!
Strategy 3: Contact Parents
If you’re a form tutor/homeroom teacher, this one is really important, but it can be used by any subject teacher too.
In the first few weeks of school it can be a good idea to contact parents to let them know how their child is getting on.
I’ve found that telephone calls work best, as well as face-to-face conversations, as both of these methods involve a relaxed sense of dialogue that’s not normally available through methods such as e-mail.
Benefits of this strategy include:
Extra intelligence, such as the student’s approach to homework in their real home environment, can be gathered
It puts the parents’ at ease and reassures them
It can be used as a motivational tool for your new students – if you’ve passed on praise to their parents then they will feel happy and will know that mum or dad is only a phone call away.
It can pre-empt a settling-in parent’s evening, providing common ground and information before a face-to–face meeting
Strategy 4: Play Games
People who have been following me for some time will know that I am a big advocate for the use of learning games in teaching. They break up lessons into chunks, appeal to the multi-sensory needs of your learners and stop your kids getting bored.
What could be better than that?
But which games should you use to get to know your students?
There are a number of learning games you can play at this very useful blog post of minehere. All of those games can be adapted to a ‘getting-to-know-you’ lesson, but my favourites for this specific context are given below:
#1: Splat
This quick game is so easy: all you need is a whiteboard, whiteboard markers and a class of kids. It’s a great game for consolidating key vocabulary and is perfect for E.A.L. learners. You could potentially replace key words with students’ names in a ‘getting-to-know-you’ lesson.
Here’s a short video showing a quick clip of me playing ‘Splat’ with my students (I will include some more lengthy clips soon, but this is a good start):
#2 Mystery Word
Another easy game. This time, students randomly pick out written words from a hat (or cup, beaker, container, etc.), and then they have to explain their word to the class (without saying the word). The students who are listening have to guess what the word is. Again, you could potentially replace the words with students’ names in a ‘getting-to-know-you’ lesson.
#3 Who am I?
A very simple game. All you need are post-it notes and a class full of energized students! Great fun. Perfect for reinforcing key vocabulary and concepts. In a ‘getting-to-know-you’ lesson, you might want to use the hobbies and interests of different students as the key words.
Personally, I feel that it’s a shame that more teachers don’t make use of simple learning games such as these. They aren’t costly, they’re simple to do and they provide so much fun and great, deep learning for your students (when applied properly).
We welcome you to join the Richard Rogers online community. Like ourFacebookpage and follow us onTwitterfor daily updates.
The events in this article are based on actual occurrences. The names, locations and, in some instances, the genders of individuals have been changed to protect the individuals’ privacy.
It can be daunting when you start at a new school, especially if you’re a fresh graduate. Friendship and social groups will already be in place, and you may be nervous about trying to fit in, especially since you’ll be working with your new colleagues so closely.
Your first few weeks and months on the job will be a time when your new colleagues will be getting to know you for the first time too. They may also be a little nervous about approaching you for a conversation.
Here is a video summary of this blog post:
The trick here is to try and make one friend at a time. You’re in no rush! Relax, be respectful and polite, and slowly people will warm to you and trust will be built.
Don’t alienate people
People respond to new social environments in a variety of different ways. Some people are shy and reserved, whilst others are confident and chatty.
In the teaching profession, I’ve noticed that a conservative ‘middle path’ – that of being slightly reserved whilst being happy to chat with new colleagues, is the best way to go.
In my book, I describe a real situation that a former colleague of mine found himself in. He was much too cocky and intense with his humour and talk in the first few weeks of his new school year, and he annoyed a lot of people. Here is his story.
Greg was a new psychology teacher at a rapidly growing international school in Brunei. He had come from a school where staff members enjoyed a very close and communal atmosphere: where the men played on football and basketball teams together and the women often played netball, badminton and did aerobics classes. The school was managed well, and staff were encouraged to socialise and be friends with one another. Greg was sorry to leave, but the prospect of more money and a substantially better benefits package tempted him to move on.
Greg’s new school was very different to his previous one, but it took him a long time to figure that out. As soon as he started at the school, everyone knew who he was. He would greet everyone loudly and proudly, making jokes and aiming to get everyone laughing in the staff room. He had a lot of opinions about things, from religion to politics and even which teachers in his new school spoke the clearest English, even though he had only been working there for a few weeks. At staff gatherings, including casual chats in the staffroom, he was loud and boisterous and would irritate people with anecdotes and questions, even when they wanted to be left alone. He had an opinion about everything, and he thought that his new colleagues would love him for revealing all of his infallible wisdom and sharing his sense of humour with them. How wrong he was!
Greg thought he was so cool!
Greg made the inconspicuous mistake of alienating his coworkers, to the point where they didn’t even want to be around him anymore. He tried to be friends with everyone all at once, and all he ended up doing was irritating people. One member of staff even went so far as to tell him, in front of everyone in the staffroom, “Greg, sometimes I don’t know if you’re joking or if you’re just a complete retard!” This was the statement that woke him up.
Greg eventually toned things down, but it took a while for other staff members to warm to him again. Greg tried to run before he could walk, aiming to make everyone his friend all at once. What he should have done instead is focussed on making one friend at a time by taking a sincere interest in his coworkers, and gradually getting to know them.
Avoid gossip
Gossip, in all of its forms, generates distrust and is highly destructive. It is also dangerously contagious, so you really must guard against contributing to it. This is an important rule to follow at all times in your career, but especially when you’re a brand new teacher.
Building trust with your colleagues takes considerable time. One of the quickest ways that you can destroy trust before you’ve even built it is by gossiping.
Again, I make reference to this in my book as I feel it’s such an important point to make. Unfortunately, however, too many teachers fall into the habit of gossiping at all levels of the profession. I include some advice about this in Chapter 7 – ‘Working With Colleagues’, which I’ve included below:
You and I could walk into any school staff room at morning break time and, after about five minutes, we could easily distinguish between the ‘Chatty Cathys’ and the ‘Reserved Richards’. Gossips love to espouse whatever is on their mind, even if nobody else wants to hear it. They’ll tell you one funny anecdote after another, ranging from which salon they went to last week to how difficult they find the new pupil assessment software the school’s made them use. There’s also one other thing that gossips are really good at, and that’s dishing out the dirt on anyone who happens to be the topic of the current conversation.
Avoid gossip at all costs!
Gossips, without fail, are people to completely avoid at all costs (where possible). One of the reasons why gossips are famously passed over for promotion is because they can’t be trusted with the sensitive information they’d be exposed to in a managerial role. They generate distrust, and you should be very cautious with what you say when around anyone who is a famous gossip; you don’t want to give them fuel for a fire that they can burn behind your back! Additionally, if you happen to be sat with a gossip who starts to speak negatively about a colleague or the school in general, then don’t be afraid to get up and walk away. What’s more important: having a laugh or having a job? Besides, do you really want to be sat there when everyone’s complaining about the principal and that awkward moment happens when the Deputy Head walks in the staff room?
If you’re sat with gossips, or if you’re seen to be hanging around with them and chatting with them frequently, then you’ll be associated with them in the minds of senior management. If you plan on having a long and fruitful career in teaching, then remember this golden rule: don’t gossip, and don’t associate with gossips.
You never know who might be in earshot of your gossiping. You could be walking past an open window when a colleague hears you, or even standing on duty in the lunch queue when a number of students hear you too. Gossip is just simply too dangerous to get involved in. Avoid it, period!
Be careful at staff parties
Many schools around the world enjoy a congenial and lively atmosphere in which staff feel happy and trusted. Schools like this often have social gatherings, and in your first week you may be invited along to some kind of staff party or get-together.
Be careful about how you come across at staff parties. It can be easy to let loose too much, especially after a few drinks. If you feel yourself getting a bit tipsy, then don’t be afraid of calling it a night and going home.
I’ve attended my fair share of staff get-togethers over the years and sometimes drunkenness can cause issues. New teachers seem to be particularly prone to this.
Remember this: Staff parties are not for partying! Do that with your social group outside of school (and far away from school) if you must.
Know your courses and plan properly
Lesson planning can be a particularly daunting task for new teachers, especially if this is your first year on the job.
In my book, I write about the real story of a teacher who started a job in a new school with a new set of courses to teach. She found herself overwhelmed and making silly assumptions, which landed her a spot of trouble. Let’s find out what happened.
Bethan, a young teacher with high aspirations, had just started her new job at an IB World School. It was a prestigious position, and expectations were high. She had taught ‘A’ – Level Geography in her previous school, but had not taught the IB Diploma before. When she started teaching her new Year 12 class, she already had a high workload and issues to deal with at home due to relocating to her new school. To save time, she taught subject content on the ‘A’ – level syllabus, assuming that it equated to what was in the IB Course Guide. Since she already had the necessary resources from her previous school, she could prepare lesson materials quickly and easily.
Was this a good move on her part? By using the resources from her old school was she really preparing her students for their IB exams? The answer to both of these questions, unfortunately, is no. She was teaching content that possessed some overlap with the IB course, but it was patchy. In parts, her material was either not specified in the IB Course Guide, or was too complex. After several lessons of finding the subject too difficult, a student decided to find the IB Course Guide online. When he couldn’t find the material he had been taught by Bethan in there, he informed his parents, and shortly afterwards they sent an e-mail to the Head of School: Mr Brian.
How well do you know the courses you will teach?
Mr Brian, being a principal with some experience of dealing with this sort of issue before, wanted to verify the facts. He arranged a meeting with Bethan and asked her to go through her semester plan for that class. When she couldn’t produce one, and when she couldn’t answer the questions pertaining to the IB curriculum she was supposed to be teaching, Mr Brian was not the least bit happy. As a result of this, Bethan was made to produce detailed long-term plans for all of her classes; she was asked to e-mail the concerned parent with an explanation and she was placed under a lesson observation schedule so that her line manager could monitor her teaching. Additionally, this had the knock-on effect of reducing the students’ confidence in her as their teacher. Sounds excessive? The principal didn’t think so, especially when one considers that the parents at this school were all fee-paying, and rightly expected a good quality of teaching. All of this pressure, extra-workload, and embarrassment could have been avoided had Bethan had simply read through the syllabus for her course and planned accordingly.
You would be surprised at how different some syllabuses can be, even when they pertain to the same examination. An Edexcel IGCSE Mathematics syllabus, for example, is significantly different to the CIE IGCSE Mathematics syllabus. Make sure that you know which syllabus you are teaching, and don’t assume that it is the same as what you’ve taught before. Also, watch out for syllabus updates – new syllabuses can be very different to their predecessors.
Summary: Tips for new teachers starting at new schools
Focus on making one friend at a time. Don’t worry yourself with ‘fitting in’ or ‘being a part of the club’. Be polite, offer your opinions only when asked and be friendly. You’ll soon find that your new colleagues will warm up to you and will be happy to be friends with you.
Don’t come over too intense or loud. Building professional relationships takes time.
Avoid gossip at all costs. Avoid it as you would cobras, rattlesnakes and poisonous spiders.
Staff parties are a chance for you to socialize in a relaxed setting. Don’t forget that you’re in the company of your new colleagues and your bosses.
Plan properly and thoroughly. Don’t assume that different courses in the same subject follow the same content.
We welcome you to join the Richard Rogers online community. Like ourFacebook page and follow us on Twitter for daily updates.
The events in this article are based on actual occurrences. The names and, in some instances, the genders of individuals have been changed to protect the individuals’ privacy.
Have you ever been in a conversation with someone only to suspect that they were not listening? In a half-daydream, the other person hears you say “What do you think?”, to which they sheepishly reply “I’m sorry, I wasn’t listening”.
Here is a video summary of today’s article:
Today’s kids are more distracted than ever before, thanks, in large part, to technology. One only has to sit on a bus or a train to see swathes of people, young and old, consumed by a digital trance as they dance their fingertips across brightly-lit handheld screens.
But technology, and dependence on technology, is not the only thing that causes kids to switch off.
Students may simply be bored with what’s going on in class or may find the subject matter dull. They may have things on their mind (such as missing their chat time on the latest app) or may even not be feeling good that day. They may have pressures at home that they are dealing with, or social problems at school that are causing anxiety.
The first important point to make, in defense of all teachers, is that quality of teaching is only one factor that can cause students to switch off. I feel that this is often overlooked by school inspectors and some so-called ‘experts’ in the field. It’s impossible to solve or transmute all of the personal emotional problems of your students within the framework of a taught lesson. This is why good pastoral care, mentoring and counseling are such a vital part of a child’s care and education.
In this article, we will focus on bringing students back from the abyss when they begin to drift. If, however, you’re looking for more strategic tips for behavior management, then this blog post of mine here will help. We will also touch upon some holistic strategies for dealing with problems beyond the parameters covered through direct teaching.
Tip number 1: Find out what they’re interested in
Using the interests and hobbies of your students to inform your teaching can be a very powerful method of getting students to engage with the lesson content.
Let’s examine a real example of this technique in action. Here follows a short extract from mybook:
Charlene was an experienced and well-liked teacher of secondary science. She got on very well with her students, and parents would often mention that they appreciated her ‘special attention’ to their children. She was liked by her colleagues, and she enjoyed her work. One day, her physics student came to school with a broken arm in a plaster cast. John, a keen gymnast, mentioned that he had fallen very hard in a training session two days ago. Charlene immediately knew that this was golden information for her lesson planning.
In John’s next physics lesson, Charlene was teaching the class about forces and motion. As John entered the class, she presented him with a starter activity revolving around the forces that act upon a gymnast when taking off and landing on a springboard. She also asked John how he was doing (and she was sincere in asking). He said he was healing well, and Ms. Charlene mentioned that“We can use your experience to help the class today, would that be okay?” John said sure.
After completing and peer assessing the starter worksheet, Ms. Charlene asked John to tell the class what had happened to his arm. He gladly told his story, and Ms. Charlene asked for everyone to clap after he had finished. Using humor and good teaching practice, she said, “So using John’s story to help you, what do you think one of today’s objectives could be?”
One student mentioned a funny comment about how you should always land on your feet and not on your arm like John did, which Ms. Charlene responded to with a smile and a giggle. After this, and with some prompting from their teacher, some students spoke about the importance of gravity in determining the force upon impact, and the speed of free fall. At the end of a very interesting and varied lesson, Charlene allowed her students the opportunity to sign John’s plaster cast, if they hadn’t done so already.
Let’s examine what Charlene did that made this lesson (and her rapport/relationship with students) so special:
used the hobby of her student to generate a lesson activity (the starter worksheet)
showed a sincere care and concern for her student
was genuinely interested in the whole life of her student (as she was with all of her students)
used student ‘expertise’ to enhance the lesson content (she asks John to talk to the class about what had happened)
was tasteful in her humor, and made sure that John is happy to share his story before she asks him to do so.
rewarded the class for their good work by allowing them a few minutes at the end to sign John’s plaster cast; not only did this subtly reveal her caring and ‘human’ nature, but it also bonded the class together as a whole
Being interested in the holistic attributes of our students can do wonders in terms of rapport, which can help a lot when engaging students. I often refer to the goals and dreams of my kids to get them focussed. “John, you must learn about this if you want to be an engineer. All engineers must be good at using mathematics”
Even a short conversation in the lunch queue can work wonders in terms of rapport building. “What are you guys having for lunch today?”. “How’s everything going?”. “How did last night’s football match go? I heard that you were playing against Grange Hill”
Remember the info you extract from these conversations, and use it to compound your rapport with your students. Refer to it when needed for motivational purposes “Miss Claire tells me that you produce beautiful homework in History class, so I know that you have the ability to produce great work. I know you can do this!”
Whilst this is a long-term technique that takes time to produce significant results, it is one of the most powerful. Students tend to be more focused in class when they like their teachers, and rapport-building is the key to getting students on your side.
Tip number 2: Ask the students to help out with something
Ask disengaged students to help you with something, even if it’s small. I’ve used this consistently with some of the most notorious students of the moment, and it works like a treat.
My most memorable, and most celebrated example, is that of a boy called Billy.
I’d just started working at a high school in northern England. I was taking over a class from a teacher who had left the school. That teacher left me some handover notes, in which she had said ‘Do not confront Billy under any circumstances”
I asked my HoD to elaborate, and he repeated the message. This was before I had even met the class, so naturally, I was a little nervous!
My first lesson with this class started normally. The students were seated and attentive. Then, a kid walked in late – it was Billy. He walked in, and said “Hello”. Since I’d been warned about him, I responded with a friendly “Come on in young man. Take a seat. Nice to meet you.”
There was a giggle from some of the students in class. They expected me to shout at him. But I knew better. I knew that I had to build up a good rapport with this student in order to be effective and use sanctions later on if necessary.
Billy then took out a can of cola and began drinking it in class. A big no-no in the Science lab.
I set the kids some work to do, and I walked over to have a conversation with Billy.
As I approached Billy’s desk, I noticed that he had a beautiful display case of felt-tipped pens in front of him. I said to him “Wow! You’re so well-prepared. I wish that all of my students were as organized as you”
He was stunned!
This was a kid who was on detention daily, getting into arguments with virtually all of his teachers. Now he was being recognized for something of value that he had. The effect was utterly transformational.
“Err, well yeah, I always like to be ready for my lessons”
We had a nice conversation in which he told me that he wanted to be a tattoo designer. I then drew his attention to the artistic design of the cola can, and reminded him that he could not drink it in here. He smiled.
After allowing him a few minutes to drink it outside, he came back in. I gave him the unofficial job title of Class Presentation Chief, and his job was to walk around the class on occasion and check the presentation of people’s work. I’d also ask him to help out in class demos.
The effect was transformational – he loved the responsibility, and he loved the sincere praise and encouragement he was getting. He was like an angel in my classes, to the point where staff room conversations about this kid were abruptly stifled when someone would ask me ‘How’s Billy doing in Science”, and I would say “He’s great”.
At the end of that academic year, I saw Billy on GCSE results day. He’d achieved a grade C in Science – his highest score out of all of this subjects. He was chuffed.
Giving students tasks to do, whether on a long or short-term basis, can really have a massive effect on their sense of empowerment and importance, which can lead to extra motivation and a determination never before seen.
Tip number 3: Use body language and keys
Where possible, it is always best to stop low-level distraction in its infancy, before it manifests itself into something bigger. One of the best ways to do this is to use subtle, low-key expressions using your physiology. Some examples include:
The ‘look’: When I hear low-level chatter or disruption, I often pause mid-sentence (or I pause the video or slideshow if that’s the media I’m using at the time), and I simply look at the student in a way that says “We’re all waiting for you to be quiet”. This immediately draws the attention of all of the students, and it can have quite a large impact. I often accompany ‘the look’ with a half-grin, so as to not appear too aggressive or antagonistic. I also accompany this by opening my arms as if to say “Come on, you know that’s wrong”.
Maintaining proximity: Being in close proximity to the disruptive student can be a very effective, non-invasive way to keep him or her on-task. I may also tap on the student’s desk and point to their work, to remind them that they need to stay focused.
Stimulus actions: These are particularly helpful when there is a lot of whole class disruption, but you may need to give the kids a little bit of training beforehand. In the past I have used the following:
Clapping twice, after which the students all clap three times (this is a ritual they have memorized) Singing “If you’re happy and you know it clap your hands” and all the students clap
Raising my hand, after which all of the students copy by raising their hands These low-key, non-intrusive behavior management techniques are highly effective at stopping distraction before it manifests into a confrontation. This works particularly well if it’s done in a light-hearted, happy way.
Tip number 4: Move the students to the ‘action center’
Basically, if kids are persistently distracted, then move them.
You may wish to set up some kind of seating plan (seating disruptive kids with a cluster of more focused students can sometimes help). You may even wish to bring distracted students to the front of the class, where possible.
If two or more kids are chatting persistently, then it’s a good idea to split them up before dishing out any kind of sanction (e.g. a detention). It’s useful if this kind of rule is imposed since day one (Consistent chatter and you’ll be moved), otherwise, you may end up with a confrontation on your hands.
Tip number 5: Praise and encourage your students regularly
Praise is powerful if it’s used properly. Here are some tips:
Here are some tips:
Praise only works if it is sincere. Flattery loses its effect over time. Always find something genuine and meaningful to celebrate.
Use a variety of methods to praise and encourage your students. Comments written on their work, verbal praise in the classroom, multimedia-based praise (e.g. comments on blogs, stars on student-generated websites, ‘stickers’ in learning management system (LMS) forums, etc.) and informal chats outside of the classroom are all great ways to make your students feel appreciated and important.
If a student produces a really good piece of work, make sure you show it to the class as a good example to follow. This will make the student feel extra special and will encourage both the student and the rest of the class to work even harder. If your school has an LMS, a novel way to do this would be to scan the work and post it on your subject page. If not, simply projecting the work onto your interactive whiteboard or just holding it up in front of the class will have an uplifting effect on that student.
When you do have to reprimand or correct your students, make sure you praise them for something first. Every human being, no matter who they are, receives criticism much better if their inhibitions are overcome with praise first. A good rule is the “two stars and a wish rule”, where you praise two things that went well, and you suggest a target to make this work ‘even better.’
Tip number 6: Play games with your students and get them competing with each other
Friday afternoon of the 2013/14 academic year was a challenge for me at first. I had double Year 9 Science, and many of the kids were exhausted after running around like crazy on the school field at lunchtime.
However, things soon changed.
I used Friday afternoons as a competition and review time, where my kids would play learning games to earn House Points. It worked like a treat, with the students loving each lesson and going home for the weekend on a high.
Try playing these games with your kids:
#1: Splat
This quick game is so easy: all you need is a whiteboard, whiteboard markers and class of kids. It’s a great game for consolidating key vocabulary, and is perfect for E.A.L. learners.
Here’s a short video showing a quick clip of me playing ‘Splat’ with my students (I will include some more lengthy clips soon, but this is a good start):
#2 Mystery Word
Another easy game. This time, students randomly pick out written words from a hat (or cup, beaker, container, etc.), and then they have to explain their word to the class (without saying the word). The students who are listening have to guess what the word is.
#3 The Poster Game
Possibly the most fun and competitive game I’ve ever invented for teaching new content. You’ll need space for the kids to walk/run, and the game does take some prep. However, once you (and your students) become used to playing this game you’ll find that it’s a doddle to set up in no time at all.
#4 Who am I?
A very simple game. All you need are post-it notes and a class full of energized students! Great fun. Perfect for reinforcing key vocabulary and concepts.
# 5 Bingo
Got some equation symbols or mathematical problems to teach your kids? Perhaps the symbols of the periodic table is more your thing? Whatever it is, this simple game can be adapted to suit any subject.
# 6 Vocabulary Musical Chairs
You’ll need a good rapport with your kids to use this one, as it needs to be controlled really well by the teacher (e.g. to avoid kids bumping into each other). However, it is simple, fun and worth the effort!
# 7 Mystery Picture
This one takes some imagination on the part of the teacher and some training of the kids beforehand. However, it’s really, really good for encouraging higher order thinking skills.
Tip number 7: Have a one-to-one conversation
One of the key mistakes I made in my first few years of teaching was that I would sanction my students too quickly, citing whatever system was in place as my justification. This sometimes led to a confrontation, and a lot of extra work on my part (e.g. supervising detentions).
Sometimes students can get really ‘stuck in a rut’ with their behavior and lack of focus, often going on ‘auto-pilot’ for no apparent reason.
Sit down with students like this and have a one-to-one conservation. Listen to them. Find out what their ambitions in life are, and reassure them that you are there to help them to succeed.
Refer any important information to a pastoral leader or school counselor if necessary (e.g. if a student is in danger). This website acts a good guide for gauging when this kind of referral may be needed, but always check with your school’s leadership first.
We welcome you to join the Richard Rogers online community. Like ourFacebook page and follow us on Twitter for daily updates.
A new academic year is fast approaching, and no doubt you’ll have some INSET or Teacher Training days coming up very soon. One of your first duties might be to do up your classroom and make it look pretty.
A warm, inviting classroom that’s colorful, fresh and light can really benefit your students. In fact, expansive research published by theUniversity of Salfordshown that well-designed classrooms can improve learning progress in primary school pupils by up to 16%.
This was the first time that clear evidence of the effect of the physical classroom environment on learning was established.
Oftentimes, teachers are stuck with the classrooms they are given. If your furniture is old, natural light is bad or the air-conditioning isn’t perfect, then it’s tough luck. One thing we can change, however, is the quality of our displays. Other aspects of the classroom environment can also be adjusted alongside this (See my article about this here:The Starbucks Protocol), so don’t neglect that side of the equation either.
So what are the best ways that we can create beautiful classroom displays?
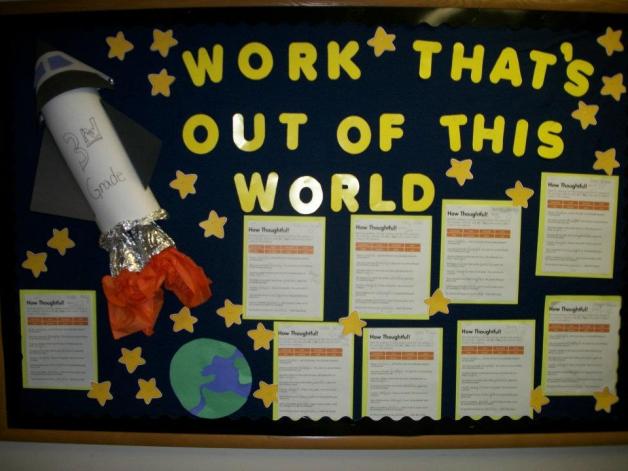
#1: Display Student Work
‘Works That’s Out of This World’ Courtesy of Jenn Bair
Why?:
Provides kids with a sense of pride and accomplishment
Acts as a ‘living demonstration’ of the excellent learning that’s going on in your class
Provides a benchmark for all students to aspire to
How?
Provide opportunities for students to complete large projects (groupwork lends itself well to this).
Make the output theme-based and creative (e.g. ‘Create an infographic about the events leading up to World War Two)
Have very clear success criteria in place (e.g. The newspaper article should contain at least three neat paragraphs and two clear and colorful pictures)
CRUCIAL:Select work to display based on the agreed success criteria
OPTIONAL EXTRA’S:
Get the students to select the best work to display
Display the brief of the task given and the success criteria
Display your comments on the work (or, even better. get the students to write two things they like about each piece of work and use sticky notes to attach to each)
#2: Display Student Achievements and Progress
Why?
Can motivate high performing students
A number of parameters can be celebrated: attainment on tests, sporting achievements, progress made on a project, etc.
If done properly, it will develop a ‘growth mindset’ in your students, where they realize that they can always learn new things and make progress
Creates ‘lifelong learners’
How?
Try setting up an ‘Achievements Wall’, where examples of achievement can be constantly updated as the academic year progresses
Maybe get the kids involved – set up a plastic wallet for each kid where they can add examples of work or achievements they are proud of
Hold an ‘achievement sharing’ afternoon or lesson, at the end of each term, where students can talk about each other’s achievements
Include all of your students – don’t leave anyone out
Possibly use this kind of display to track progress on a project the kids are doing (e.g. you could have a large column for each group, where each lesson one group member adds a few bullet points to summarize what the group did).
#3: Display key words and command terms
‘Wow Words’ – Courtesy of Abby Jean Saxby
Why?
Every subject has its own set of key terminology which is essential to understanding and expressing concepts, contexts, events, and processes.
Regular exposure to the correct use of key terminology creates greater confidence in exam-prep classes
Great for bilingual, ESL and EAL students
Works with any subject
How?
Display command terms and meanings for examination classes (e,g, ‘Explain’, ‘Describe’, ‘Outline’, etc.)
Display different versions of common words for your subject (e.g. subtract/minus/take-away)
Display topic-specific terminology when kids are learning particular units (e.g. Food and Digestion words might be ‘Stomach’, ‘Foodpipe’, ‘Small Intestines’)
Use diagrams to display the key terminology for visual concepts (e.g. the parts of parallel electrical circuit)
If some students in your class speak a language other than English as their mother tongue, then you can even make your terminology multi-lingual by getting those students to translate the words
#4: Use plastic wallets
‘Finished? Try One of These….’ Courtesy of Miss Tait
Why?:
Plastic wallets keep work neat, they’re easy to stick up (only a pin is needed for each one) and they’re easy to update
Plastic wallet displays lend themselves to being more ‘interactive’ than traditional displays
How?
Fill plastic wallets with samples of excellent student work (see number 1 above)
Put the exam syllabus, program of study and exam papers inside
Students may wish to use them to store answers to quiz questions, clues for crosswords and puzzles and even revision cards for exam-preparation
If you use them to keep key words inside, then this allows you a quick access point when playing learning games such as ‘Mystery Word’ (see instructions below)
#5: Display upcoming events
Why?:
Students need to know their key deadlines and key events (such as coursework hand-in dates and examination days)
They can be used to get students excited about a theme-based event, such as World Book Day, British Biology Olympiad or school Sports Day
They can motivate students to get moving on their projects and coursework, such as their IB TOK Presentation.
How?
If the event has a glossy poster that goes with it, then definitely display that
Display the key parts of the event (e.g. the schedule for the day)
Clearly display the instructions the students must follow to get ready for the event
Display photos of past-students who were successful at this event last time (if available)
#6: Display Mission Statements
‘Class Mission’ Courtesy of Margaret Mooney/Warren County Schools
Why?
When students are reminded of their school’s overall aims, theme, and focus, it gels the school together as a winning community
When mission statements specific to courses are displayed, discussed and applied (e.g. the IB Learner Profile), they can provide students with valuable principles that will guide them their whole lives.
How?
If your school already has a published poster/document containing their mission statements, then display that
Think of ways in which the statements apply to your subject area, and display that (e.g. We are thinkers – ‘We critically evaluate our experimental methods and use the lessons learned to modify future methods).
Displays large, colorful key words from the mission statements and get your kids to add ideas as to how they can be applied inside and outside of school
#7: Display biographies of famous people
Why?
Provides inspiration
Can be used to teach about the skills and personality traits the famous people have or had
How?
Get large, clear photographs or paintings of the famous people and display those
Try to make it subject specific (e.g. Science could be Isaac Newton, Albert Einstein, etc.)
Include a paragraph or two of each person’s story. Make the text large. Emphasize the fact that they all worked hard in the face of adversity.
#8 Display memorable events
‘First Grade Timeline’ courtesy of Laura Gibson
Why?
Events which have already passed, especially if used to reinforce a subject area, can provide students with useful triggers and memories than can help their exam performance
Provides lots of talking points, which gels the school or class together as a community
How?
Include lots of photos of the event that took place
If the kids produced some kind of output (e.g. baking cakes, making scarfs, etc.) then display the work or photos of it
Try to include student summaries of what they enjoyed about the event, and what they learned from it
#9: Display exam-style questions and model answers
‘Writing About Macbeth – Exam Paper and Exemplar’ courtesy of Melanie Guidera
Why?
Reinforces the urgency and importance of the exams
Provides a benchmark (again) of excellent responses to questions
Acts as one way to teach students about exam technique
How?
Print questions from past-papers (maybe as A3 sheets) which cover fundamental, key concepts in your subject area (e.g. A classic right-angled trigonometry question in maths)
Get your students to fill in the model answers using exemplars you give them, in different colors
Display the model answers yourself, but get the students to annotate the answers in colored pens with the marks given at each stage, plus reasons why.
#10: Display revision summaries
‘Revision Wall’ courtesy of Kate Broadribb
Why?
Brings all of the concepts together
Provides a point of reference on the run-up to exams
Provides stimulus material for student-led revision
Provides motivation to revise
How?
Use mind-maps, bullet point lists, infographics and checklists
Display every page of the syllabus
Split the class into groups. Each group produces a revision poster for a particular topic
Display the URLs of websites that students can use for revision
#11: Display processes
Why?
Many subjects have processes (e.g. T, F, A, R means Thoughts lead to Feelings, Feelings lead to Actions, Actions lead to Results)
Can be used to reinforce moral or logical principles (e.g. the Four D’s of success: Discipline, Dedication, Drive, and Desire)
Can be used to memorize physical actions (e.g. DR ABC from First Aid – Danger, Response, Airway, Breathing, and Circulation)
Can be used for essential safety information (e,g, the Green Cross Code: Stop, Look, Listen)
How?
Colorful flowcharts lend themselves well to this
Display photographs or pictures of each stage
Display instructions for each stage
Show a completed template at the end (e.g. a completed scientific report on an experiment)
#12: Make it 3D
‘Our Targets’ courtesy of artforschools.wordpress.com
Why?
3D displays look impressive!
They can often include materials from the topic being covered
How?
SAFETY: Make sure no hard parts stick out too much. I once remember a display on the corridor in an old school where a glass trophy was displayed on a glass shelf, at about head-height. A partially blind student walked into the shelf and really hurt himself.
Paper is the best material for turning in 3D shapes – it’s cheap, available and relatively safe
Students can make little boxes out of paper, attached to the display board, containing answers to quiz questions
Pop-up images and ‘flip to see the answer’ type pieces lend themselves well to 3D displays
#13: Make it multi-sensory
Why?
Tons ofresearchshows the benefits of stimulating multiple senses during the learning process
It makes the display interactive and attractive
How?
Think of ways to include smells, textures and sounds to your displays (taste probably won’t work well!)
Fabrics work well for textures. Sometimes you can use the materials discussed in the display (e.g. copper wires for a display on electricity, aluminum and steel cans for a display on recycling)
Try to rig up a push-button sound system (e.g. an iPod connected to speakers with pre-loaded audio files installed)
#14: Display essential course information
‘Aim High’ courtesy of Zoe Atkins
Why?
Vital for exam preparation classes – they need to know what % each exam paper counts for, what their coursework is worth, etc.
How?
Include large, colorful titles of the course components along with their percentages
Include exemplar work for each component
Include real case-studies (e.g. Student X got 83% on Paper 1, 65% on Paper 2 and 71% on Paper 3, and ended up getting a grade B)
We welcome you to join the Richard Rogers online community. Like our Facebookpage and follow us on Twitter for daily updates.
It’s finally here! You’ve worked hard all term, perhaps even counting down the days, and now it’s the summer vacation! If you’re teaching in a British or American school, or at an accredited International School overseas, then you’ve probably got a nice 6-8 week holiday to look forward to! Time to put your feet up!
Or is it?
Most teachers would agree that we need our vacations. We work so hard during term time and we only really realise the strain this has placed upon us mentally and physically when we do get the chance to have a holiday. It’s DEFINITELY important to rest now, but; and many experienced teachers will hate me for this: it’s also time to start considering your plans for the next semester/term!
This great 5-minute video summarises some easy things you can do this holiday to get a head start and acts as a supplement to this blog post:
In my debut book:The Quick Guide to Classroom Management, I include numerous case studies of teachers who got their time-management all messed up, and paid for it massively! For my next book:Marking and Assessment Strategies, I invited twenty educators from all over the world to offer their advice on time-saving marking tips. One common theme that permeates their advice is the productive use of holidays and break-times, along with great tips such as ‘live-marking’ and using peer-assessment strategies.
What do you plan do during this school vacation?
Take a look at this list. Could you find time for some (or all) of these?
Top Tips for Time-Saving Teachers: Using your holidays to relax AND get a head start!
If possible, find out which classes you will teach next semester.Even if you only know some of them, start planning ahead. Draw up a curriculum map of the topics you will teach and the order you will teach them in. This will save tremendous time at the start of the new semester. You’ll be ahead of the game when everyone else is rushing around trying to figure things out!
Plan your marking!I talk about this extensively in my soon-to-be released book. Examine your syllabuses and long-term planning closely, and cross-reference it with your school’s academic calendar. Look for weeks when paperwork could get heavy (e.g. around the time when reports need to be written, parent consultations take place and when exams and tests need to be taken). Think about the assignments and homework you will set, and plan ahead so that you spread out your marking evenly over the whole year. This will save you many a future headache!
Read ahead! If you’ll be teaching unfamiliar topics then look them up, and make sure you can do the questions that you’ll set for kids. Subject knowledge acts as a great confidence base that improves and enhances your classroom performance.
Gather your resources together!The last thing you want to be doing is fumbling around finding PowerPoints, Prezi’s, worksheets, assignments, and tasks whilst you’re on the job, teaching a full timetable! Get prepared now, and enjoy a happy work-life balance when you’re back in school!
Go to school the week before you start and get some printing done! Now, I know that many readers might not like the idea of this. However, when you consider the mad rush for the photocopier that will ensue in your first week back, you can see how it makes sense to get a head-start.
Get your life back on track!Have you been skipping your gym classes? Too tired to do your morning run? Get your routine back in order and set your body clock to rise early and retire at a reasonable time. Keep up your new routine, and plan ahead so that you can keep doing it when you’re back at school!
Can you add any more items to the list? Please feel free to comment in the box below.
Have a happy, relaxing (and productive) holiday!Check out Richard’s Pedagogical series of books here:
We welcome you to join the Richard Rogers online community. Like our Facebook page and follow us on Twitter for daily updates.