

An article by Richard James Rogers (Author of The Quick Guide to Classroom Management)
Illustrations by Pop Sutthiya Lertyongphati
A new academic year is fast approaching, and no doubt you’ll have some INSET or Teacher Training days coming up very soon. One of your first duties might be to do up your classroom and make it look pretty.
A warm, inviting classroom that’s colorful, fresh and light can really benefit your students. In fact, expansive research published by the University of Salford shown that well-designed classrooms can improve learning progress in primary school pupils by up to 16%.
This was the first time that clear evidence of the effect of the physical classroom environment on learning was established.

Oftentimes, teachers are stuck with the classrooms they are given. If your furniture is old, natural light is bad or the air-conditioning isn’t perfect, then it’s tough luck. One thing we can change, however, is the quality of our displays. Other aspects of the classroom environment can also be adjusted alongside this (See my article about this here: The Starbucks Protocol), so don’t neglect that side of the equation either.
So what are the best ways that we can create beautiful classroom displays?
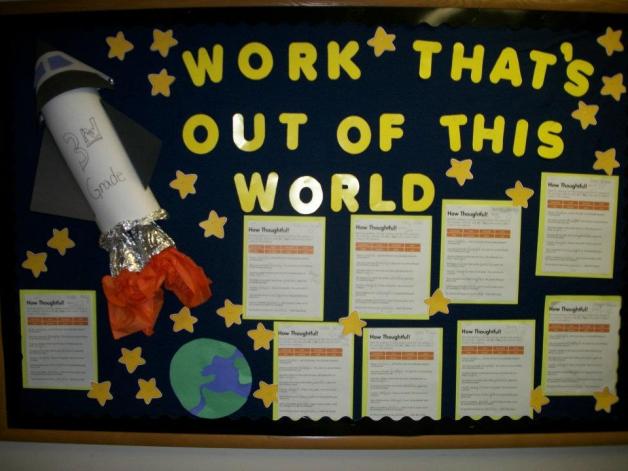
#1: Display Student Work
Why?:
- Provides kids with a sense of pride and accomplishment
- Acts as a ‘living demonstration’ of the excellent learning that’s going on in your class
- Provides a benchmark for all students to aspire to
How?
- Provide opportunities for students to complete large projects (groupwork lends itself well to this).
- Make the output theme-based and creative (e.g. ‘Create an infographic about the events leading up to World War Two)
- Have very clear success criteria in place (e.g. The newspaper article should contain at least three neat paragraphs and two clear and colorful pictures)
- CRUCIAL: Select work to display based on the agreed success criteria
OPTIONAL EXTRA’S:
- Get the students to select the best work to display
- Display the brief of the task given and the success criteria
- Display your comments on the work (or, even better. get the students to write two things they like about each piece of work and use sticky notes to attach to each)
#2: Display Student Achievements and Progress

Why?
- Can motivate high performing students
- A number of parameters can be celebrated: attainment on tests, sporting achievements, progress made on a project, etc.
- If done properly, it will develop a ‘growth mindset’ in your students, where they realize that they can always learn new things and make progress
- Creates ‘lifelong learners’
How?
- Try setting up an ‘Achievements Wall’, where examples of achievement can be constantly updated as the academic year progresses
- Maybe get the kids involved – set up a plastic wallet for each kid where they can add examples of work or achievements they are proud of
- Hold an ‘achievement sharing’ afternoon or lesson, at the end of each term, where students can talk about each other’s achievements
- Include all of your students – don’t leave anyone out
- Possibly use this kind of display to track progress on a project the kids are doing (e.g. you could have a large column for each group, where each lesson one group member adds a few bullet points to summarize what the group did).
#3: Display key words and command terms

Why?
- Every subject has its own set of key terminology which is essential to understanding and expressing concepts, contexts, events, and processes.
- Regular exposure to the correct use of key terminology creates greater confidence in exam-prep classes
- Great for bilingual, ESL and EAL students
- Works with any subject
How?
- Display command terms and meanings for examination classes (e,g, ‘Explain’, ‘Describe’, ‘Outline’, etc.)
- Display different versions of common words for your subject (e.g. subtract/minus/take-away)
- Display topic-specific terminology when kids are learning particular units (e.g. Food and Digestion words might be ‘Stomach’, ‘Foodpipe’, ‘Small Intestines’)
- Use diagrams to display the key terminology for visual concepts (e.g. the parts of parallel electrical circuit)
- If some students in your class speak a language other than English as their mother tongue, then you can even make your terminology multi-lingual by getting those students to translate the words
#4: Use plastic wallets

Why?:
- Plastic wallets keep work neat, they’re easy to stick up (only a pin is needed for each one) and they’re easy to update
- Plastic wallet displays lend themselves to being more ‘interactive’ than traditional displays
How?
- Fill plastic wallets with samples of excellent student work (see number 1 above)
- Put the exam syllabus, program of study and exam papers inside
- Students may wish to use them to store answers to quiz questions, clues for crosswords and puzzles and even revision cards for exam-preparation
- If you use them to keep key words inside, then this allows you a quick access point when playing learning games such as ‘Mystery Word’ (see instructions below)

#5: Display upcoming events

Why?:
- Students need to know their key deadlines and key events (such as coursework hand-in dates and examination days)
- They can be used to get students excited about a theme-based event, such as World Book Day, British Biology Olympiad or school Sports Day
- They can motivate students to get moving on their projects and coursework, such as their IB TOK Presentation.
How?
- If the event has a glossy poster that goes with it, then definitely display that
- Display the key parts of the event (e.g. the schedule for the day)
- Clearly display the instructions the students must follow to get ready for the event
- Display photos of past-students who were successful at this event last time (if available)
#6: Display Mission Statements

Why?
- When students are reminded of their school’s overall aims, theme, and focus, it gels the school together as a winning community
- When mission statements specific to courses are displayed, discussed and applied (e.g. the IB Learner Profile), they can provide students with valuable principles that will guide them their whole lives.
How?
- If your school already has a published poster/document containing their mission statements, then display that
- Think of ways in which the statements apply to your subject area, and display that (e.g. We are thinkers – ‘We critically evaluate our experimental methods and use the lessons learned to modify future methods).
- Displays large, colorful key words from the mission statements and get your kids to add ideas as to how they can be applied inside and outside of school
#7: Display biographies of famous people

Why?
- Provides inspiration
- Can be used to teach about the skills and personality traits the famous people have or had
How?
- Get large, clear photographs or paintings of the famous people and display those
- Try to make it subject specific (e.g. Science could be Isaac Newton, Albert Einstein, etc.)
- Include a paragraph or two of each person’s story. Make the text large. Emphasize the fact that they all worked hard in the face of adversity.
#8 Display memorable events

Why?
- Events which have already passed, especially if used to reinforce a subject area, can provide students with useful triggers and memories than can help their exam performance
- Provides lots of talking points, which gels the school or class together as a community
How?
- Include lots of photos of the event that took place
- If the kids produced some kind of output (e.g. baking cakes, making scarfs, etc.) then display the work or photos of it
- Try to include student summaries of what they enjoyed about the event, and what they learned from it
#9: Display exam-style questions and model answers

Why?
- Reinforces the urgency and importance of the exams
- Provides a benchmark (again) of excellent responses to questions
- Acts as one way to teach students about exam technique
How?
- Print questions from past-papers (maybe as A3 sheets) which cover fundamental, key concepts in your subject area (e.g. A classic right-angled trigonometry question in maths)
- Get your students to fill in the model answers using exemplars you give them, in different colors
- Display the model answers yourself, but get the students to annotate the answers in colored pens with the marks given at each stage, plus reasons why.
#10: Display revision summaries

Why?
- Brings all of the concepts together
- Provides a point of reference on the run-up to exams
- Provides stimulus material for student-led revision
- Provides motivation to revise
How?
- Use mind-maps, bullet point lists, infographics and checklists
- Display every page of the syllabus
- Split the class into groups. Each group produces a revision poster for a particular topic
- Display the URLs of websites that students can use for revision
#11: Display processes

Why?
- Many subjects have processes (e.g. T, F, A, R means Thoughts lead to Feelings, Feelings lead to Actions, Actions lead to Results)
- Can be used to reinforce moral or logical principles (e.g. the Four D’s of success: Discipline, Dedication, Drive, and Desire)
- Can be used to memorize physical actions (e.g. DR ABC from First Aid – Danger, Response, Airway, Breathing, and Circulation)
- Can be used for essential safety information (e,g, the Green Cross Code: Stop, Look, Listen)
How?
- Colorful flowcharts lend themselves well to this
- Display photographs or pictures of each stage
- Display instructions for each stage
- Show a completed template at the end (e.g. a completed scientific report on an experiment)
#12: Make it 3D

Why?
- 3D displays look impressive!
- They can often include materials from the topic being covered
How?
- SAFETY: Make sure no hard parts stick out too much. I once remember a display on the corridor in an old school where a glass trophy was displayed on a glass shelf, at about head-height. A partially blind student walked into the shelf and really hurt himself.
- Paper is the best material for turning in 3D shapes – it’s cheap, available and relatively safe
- Students can make little boxes out of paper, attached to the display board, containing answers to quiz questions
- Pop-up images and ‘flip to see the answer’ type pieces lend themselves well to 3D displays
#13: Make it multi-sensory
Why?
- Tons of research shows the benefits of stimulating multiple senses during the learning process
- It makes the display interactive and attractive
How?
- Think of ways to include smells, textures and sounds to your displays (taste probably won’t work well!)
- Fabrics work well for textures. Sometimes you can use the materials discussed in the display (e.g. copper wires for a display on electricity, aluminum and steel cans for a display on recycling)
- Try to rig up a push-button sound system (e.g. an iPod connected to speakers with pre-loaded audio files installed)
#14: Display essential course information

Why?
- Vital for exam preparation classes – they need to know what % each exam paper counts for, what their coursework is worth, etc.
How?
- Include large, colorful titles of the course components along with their percentages
- Include exemplar work for each component
- Include real case-studies (e.g. Student X got 83% on Paper 1, 65% on Paper 2 and 71% on Paper 3, and ended up getting a grade B)

We welcome you to join the Richard Rogers online community. Like our Facebook page and follow us on Twitter for daily updates.

One thought on “Creating Classroom Displays: Essential Tips for Teachers”